
True Detect AIUser Guide
ENKOZHJA
⬇ PDF

True Detect AI

User Guide

K-Device Lab, Seoul, makes True Detect AI for companies that buy and sell used phones in bulk.

truedetectai.net

K-Device LabTrue Detect AI
TRUEDETECT AI

User Guide

K-Device Lab, Seoul, makes True Detect AI for companies that buy and sell used phones in bulk.

Everything you need to test, certify and protect phones with True Detect AI - step by step, with real screenshots.

17 chapters4 languagesPDF download
Start reading β†’

Recommended for best results: Windows 11 Β· 16 GB RAM or more Β· a good USB cable Β· a good USB hub Β· a good WiFi router.

✨
CHAPTER 01

About True Detect AI

True Detect AI is a Windows tool for companies that buy and sell used phones in bulk. It reads each phone, tests every part, writes a certificate, and protects the phone with MDM until the sale is paid.

What you can do with the tool

TaskWhere
Read a phone's full identity, locks, battery and partsDevice page
Test many phones at the same time (21 hardware tests)Device Test
Apply / remove MDM protection, lock iPhonesDevice Protection & MDM
Activate or erase many iPhones at onceActivate & Erase
Print a QR / barcode label for each phonePrint Labels (F4)
Certified data wipe with a PDF certificateTrue Data Wipe
Find old test reports and print certificatesReport
Firmware, reboot, screenshot and other toolsSmart Flash Β· Utility
Employees, login history, Wi-Fi and test settingsUser page
The tool works in English, ν•œκ΅­μ–΄, δΈ­ζ–‡ and ζ—₯本θͺž. Click a flag at the bottom of the left menu to change the language at any time.

Before you start

Next β†’Sign up & sign in
πŸ”
CHAPTER 02

Sign up & sign in

When you open the tool, the login window appears first. A new company creates an account, then waits for approval.

1 Sign in

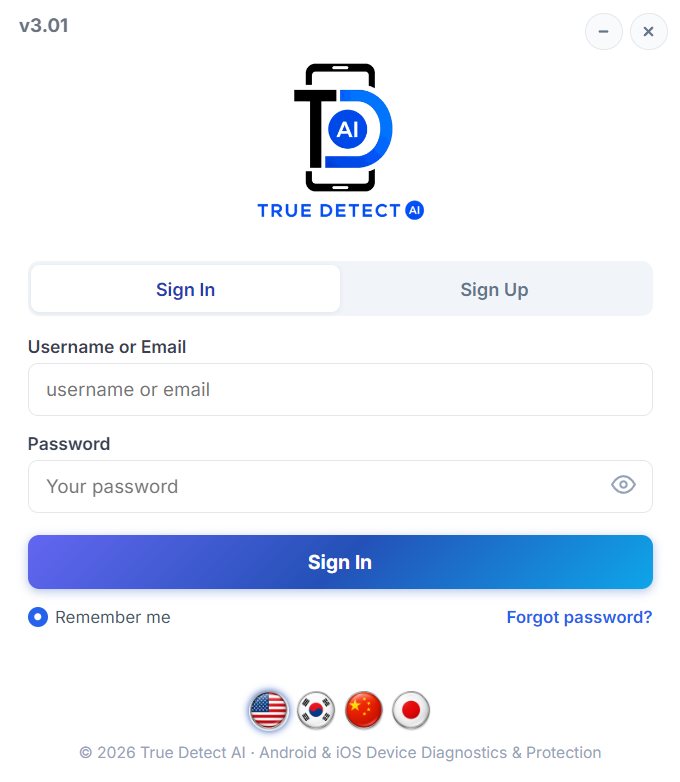
The Sign In screen.
  1. Type your Username or Email and your Password. The eye icon shows the password.
  2. Tick Remember me if you want the tool to keep your username.
  3. Click Sign In.
  4. Use the flags at the bottom to change the language of this window.
MessageMeaning
Wrong username or password.Check the spelling, or use Forgot password?
Too many login attemptsWait 15 minutes, then try again.
Your subscription has expiredContact the Sales Team to renew.

2 Create a new account (Sign Up)

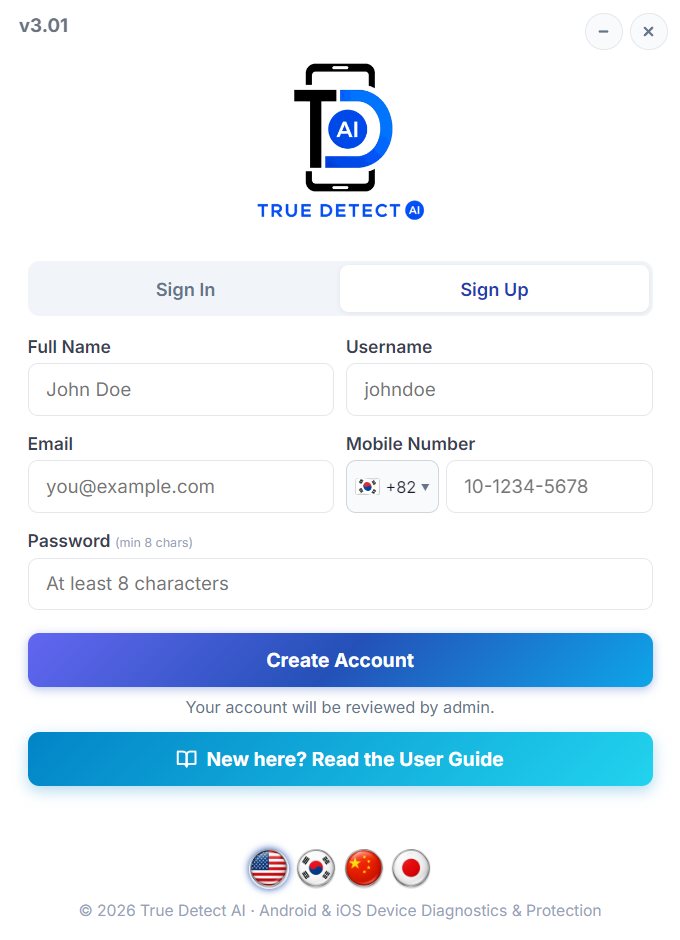
The Sign Up tab.
  1. Click the Sign Up tab.
  2. Fill in Full Name, Username (3–30 letters: a-z, 0-9, _ and .), Email, Mobile Number (pick the country code first) and a Password of at least 8 characters.
  3. Click Create Account. A 6-digit code is sent to the mobile by SMS.
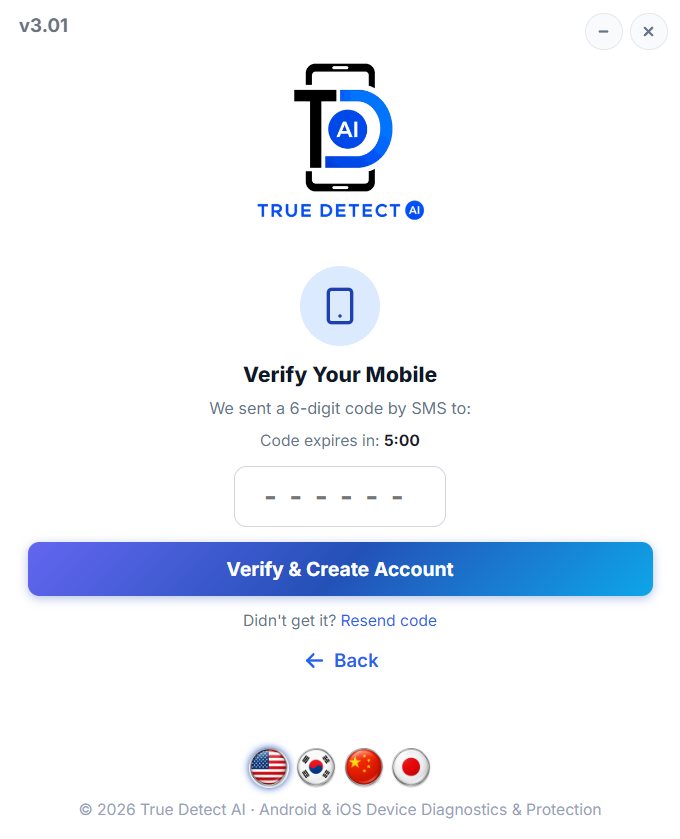
Verify Your Mobile - type the SMS code.
  1. Type the 6-digit code within 5 minutes and click Verify & Create Account.
  2. No code? Click Resend code.
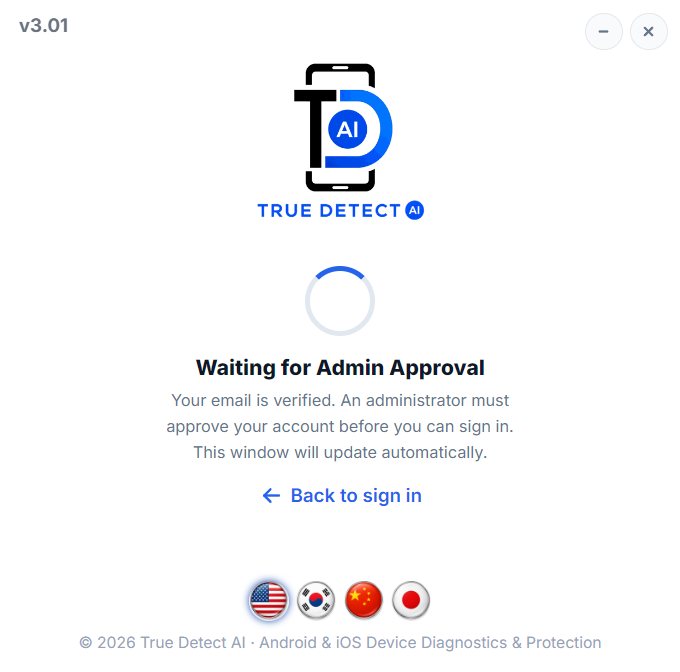
Waiting for Admin Approval.

The new account must be approved before it can be used. This screen checks by itself every few seconds. When the account is approved it shows Account Approved! and takes you back to sign in.

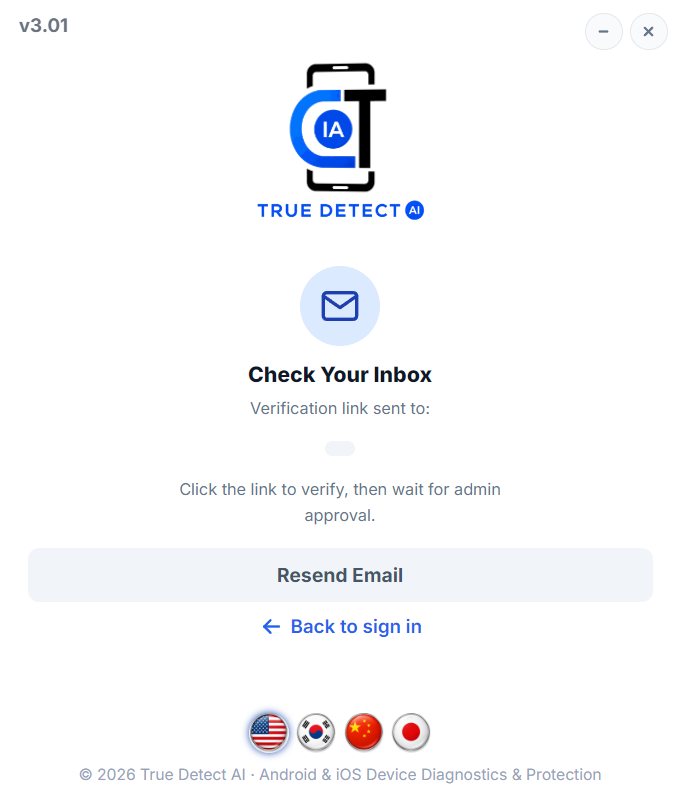
Check Your Inbox - shown when the email is not verified yet.

If this screen appears, open the email and click the verification link. Click Resend Email if it did not arrive.

3 Signing in on a new PC

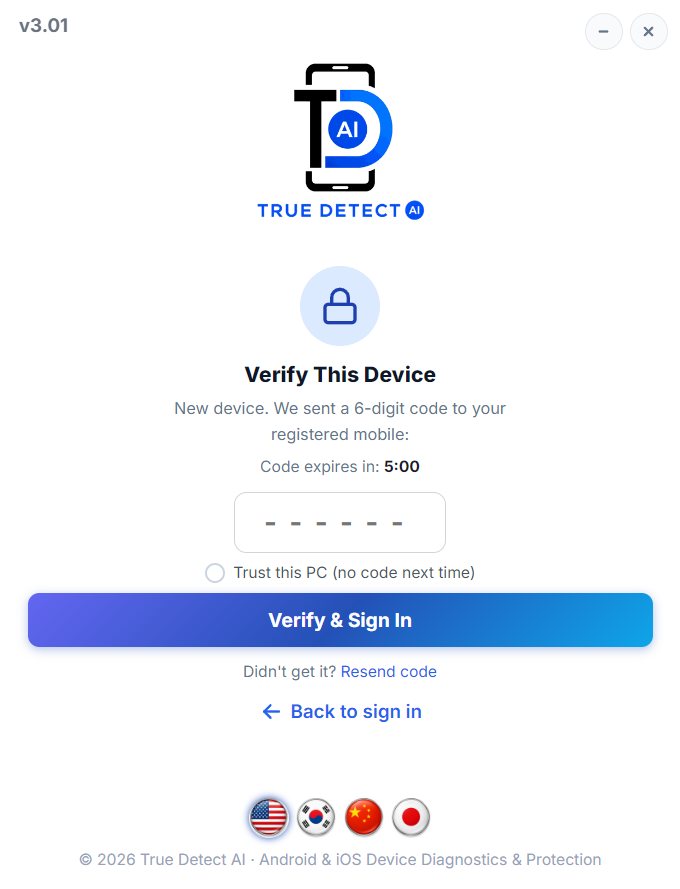
Verify This Device.

When you sign in on a PC the account has not used before, a 6-digit code is sent to the registered mobile. Type it and click Verify & Sign In. Tick Trust this PC (no code next time) so this PC does not ask again.

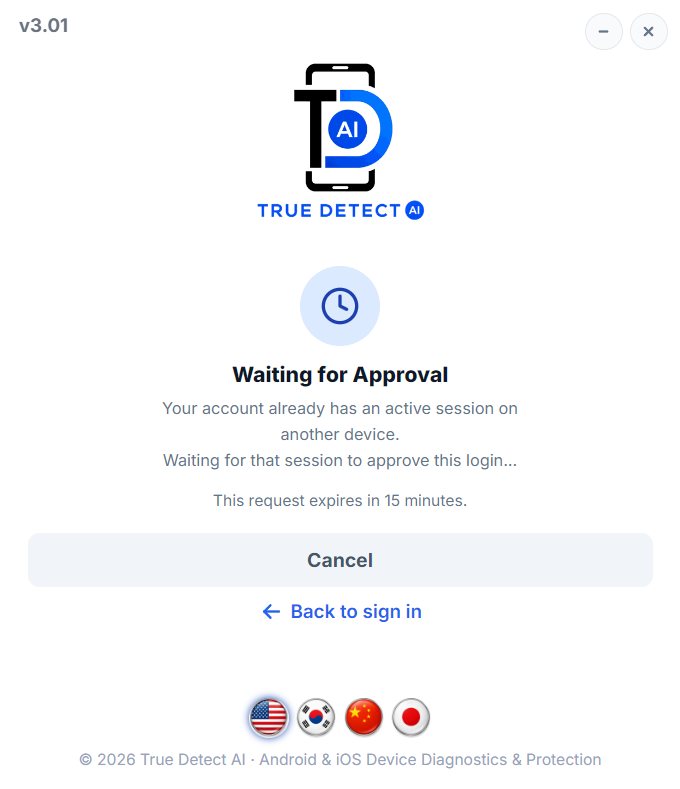
Waiting for Approval - the account is already open on another PC.

One account can be signed in on one PC at a time. If it is open somewhere else, the person on that PC is asked to allow it. If they refuse, you see Login denied by active user. Click Cancel to stop waiting.

Each employee should have their own login. The owner adds employees on the User page.

4 Forgot password

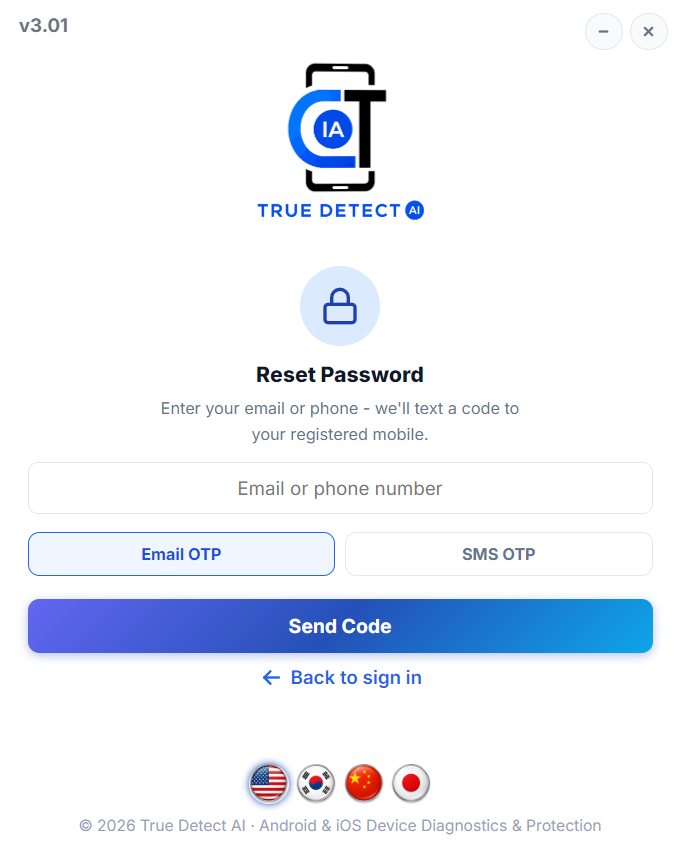
Reset Password.
  1. Click Forgot password? on the Sign In screen.
  2. Type your email or phone number, choose Email OTP or SMS OTP, and click Send Code.
  3. Type the 6-digit code and a new password (at least 8 characters).
  4. The tool goes back to Sign In with the new password already filled in.
← PreviousAbout True Detect AINext β†’First setup (Wi-Fi + User Code)
βš™οΈ
CHAPTER 03

First setup (Wi-Fi + User Code)

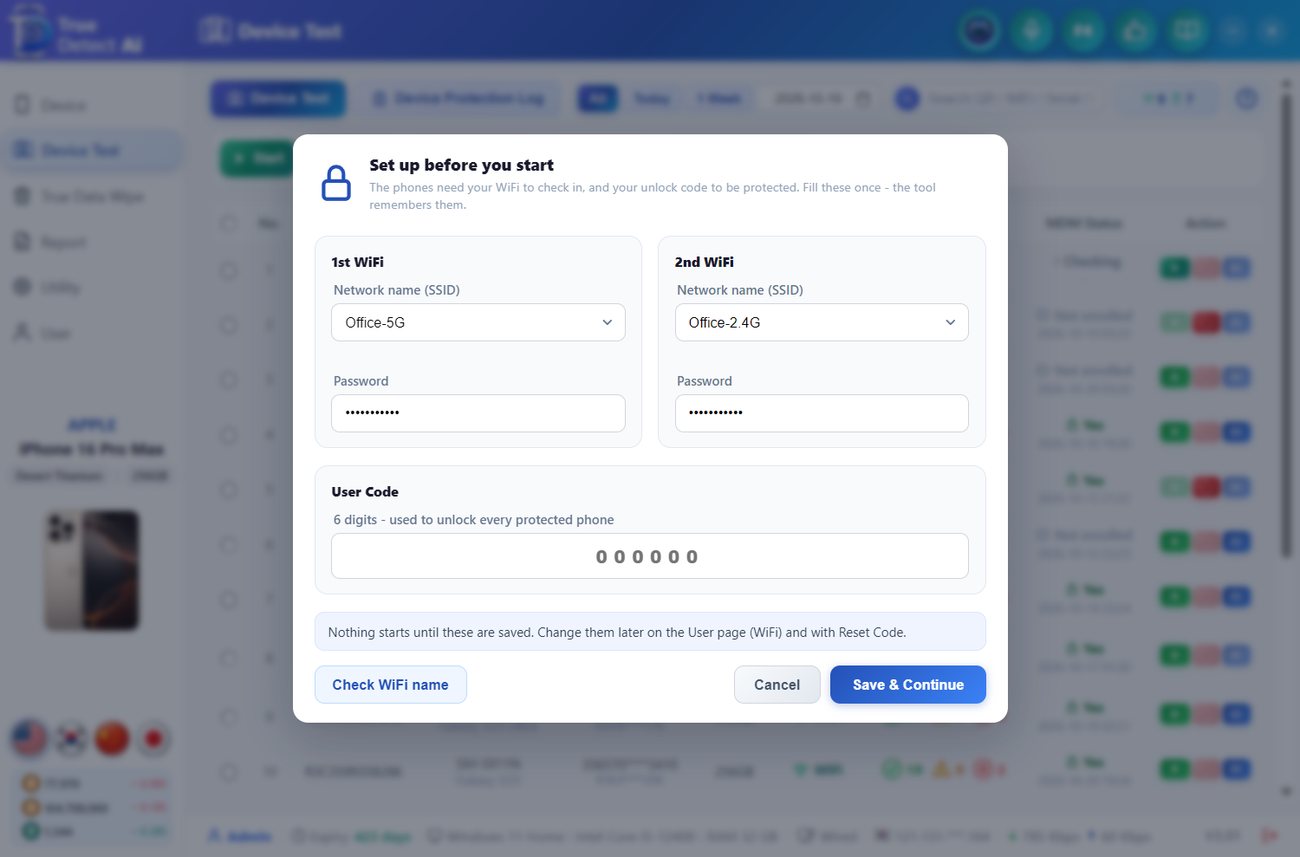
The first time you press Start, Test, Apply MDM or QR, the tool asks for two things once: the Wi-Fi the phones will use, and your User Code.

Set up before you start.
  1. 1st WiFi and 2nd WiFi: pick the network name (SSID) from the list of nearby networks, or type it, then type the password.
  2. Click Check WiFi name. The tool checks that this name really exists in the air - with the PC's Wi-Fi, or with the phone on the cable.
  3. User Code: type 6 digits. This code unlocks every phone your company protects. Keep it inside the company.
  4. Click Save & Continue. The action you started continues by itself.
Wi-Fi check resultMeaning
βœ“ Found (seen by the phone)The name is correct.
βœ• This name is not in the airCheck the spelling. You can still save, but the phones may not connect.
Cannot checkThis PC has no Wi-Fi and no phone is on the cable.
Change the Wi-Fi later with WiFi Set (User page or Device page). Change the code with Reset User Code on the User page.
← PreviousSign up & sign inNext β†’The main screen
πŸ–₯️
CHAPTER 04

The main screen

Every page has the same frame: the header on top, the menu on the left and the status bar at the bottom.

The main window with an iPhone connected.

Header buttons (top right)

ButtonWhat it does
🎀 MicrophoneVoice commands - say a command instead of clicking. Shown once the voice engine is installed.
πŸ€– AI AssistantOpens the AI chat. Ask how to do something, in any of the 4 languages.
πŸ–¨ F4 / PrintPrints the label of the phone on the Device page. Same as the F4 key.
πŸ‘ FeedbackSend a problem report or idea with screenshots. See Help & feedback.
β€” / βœ•Minimize / close the tool.

Left menu

MenuUse
DeviceAll information of the phone on the cable.
Device TestTest many phones, apply MDM, see the Device Protection Log.
True Data WipeCertified erase with a PDF certificate.
ReportAll saved test reports and certificates.
UtilityPrint labels, Wi-Fi QR, reboot, Smart Flash, drivers and more.
UserAccount, employees, history, Wi-Fi and test settings.

Below the menu: the connected phone (photo, colour, storage), the language flags, and a small weather / exchange-rate box.

Status bar (bottom)

From left: the signed-in user, Expiry (days left on the plan), PC information, connection type (Wired / WiFi), public IP, live internet speed, the tool version and the Sign out button.

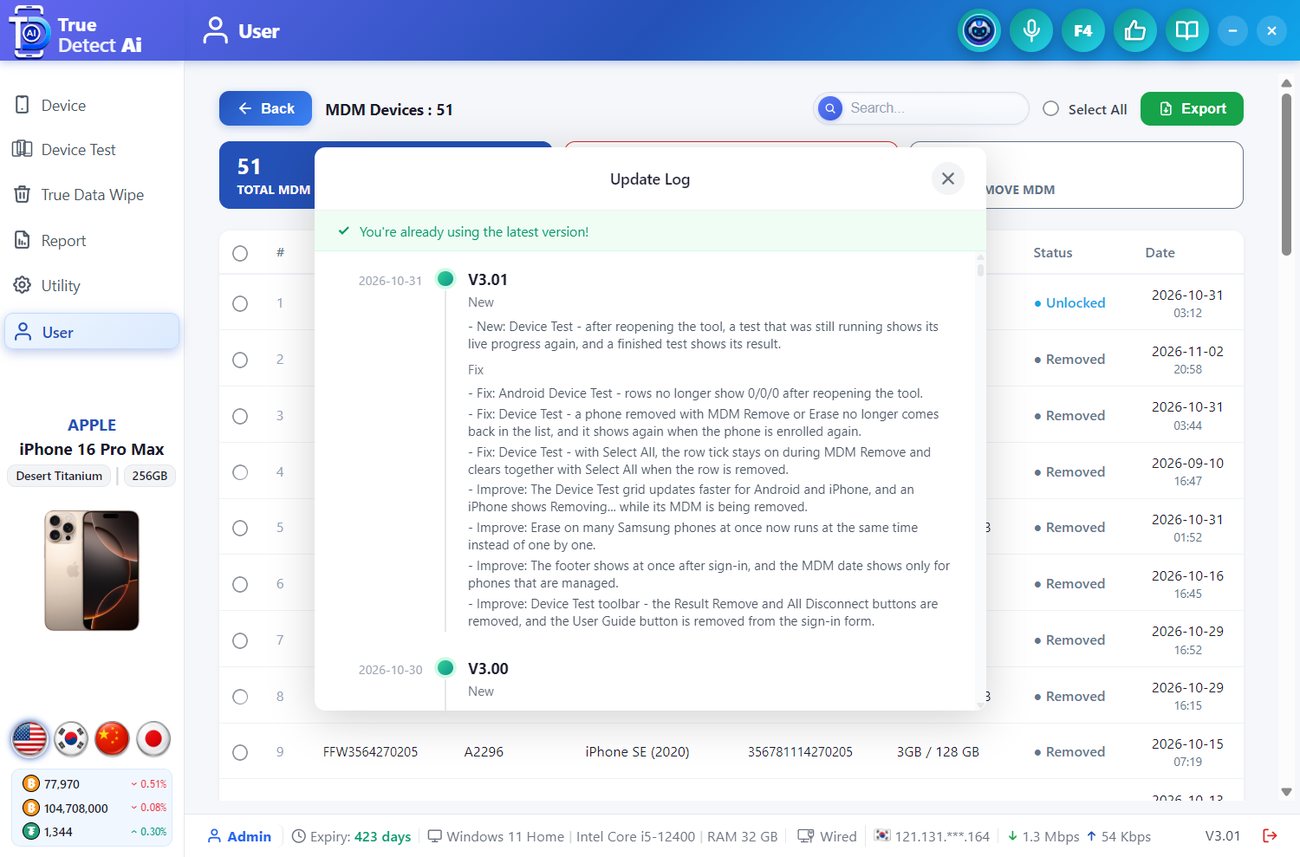
Update Log - what changed in each version.

Keyboard shortcuts

KeyAction
F4Print the label of the connected phone.
F5 or Ctrl+RRefresh the page or popup you are on. If the phone's data is empty, the phone is read again. Nothing on the phone is changed.
Alt+F11Send a support report of this PC to our team.
Barcode scannerScan a QR / IMEI / serial on any page - it goes straight into that page's search box.
← PreviousFirst setup (Wi-Fi + User Code)Next β†’Connect a phone
πŸ”Œ
CHAPTER 05

Connect a phone

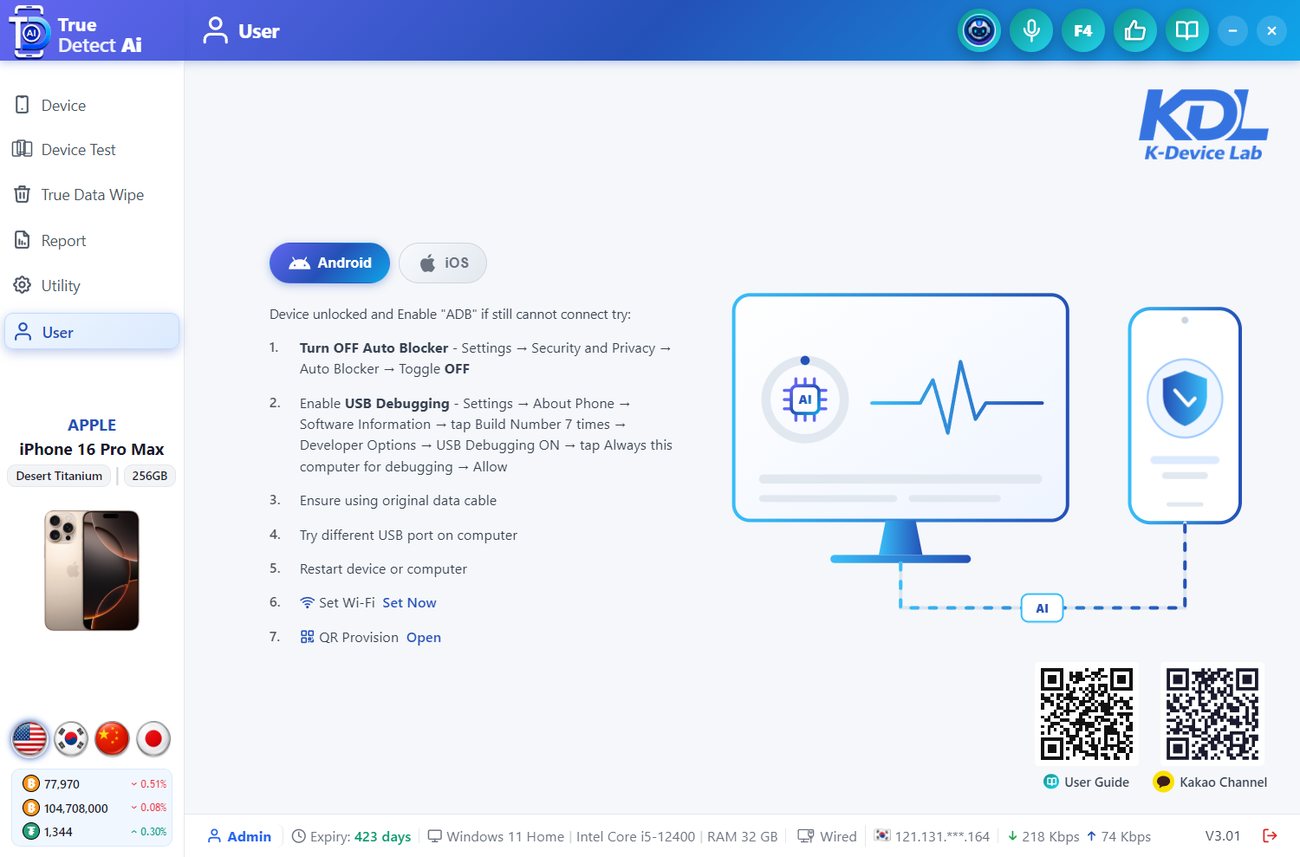
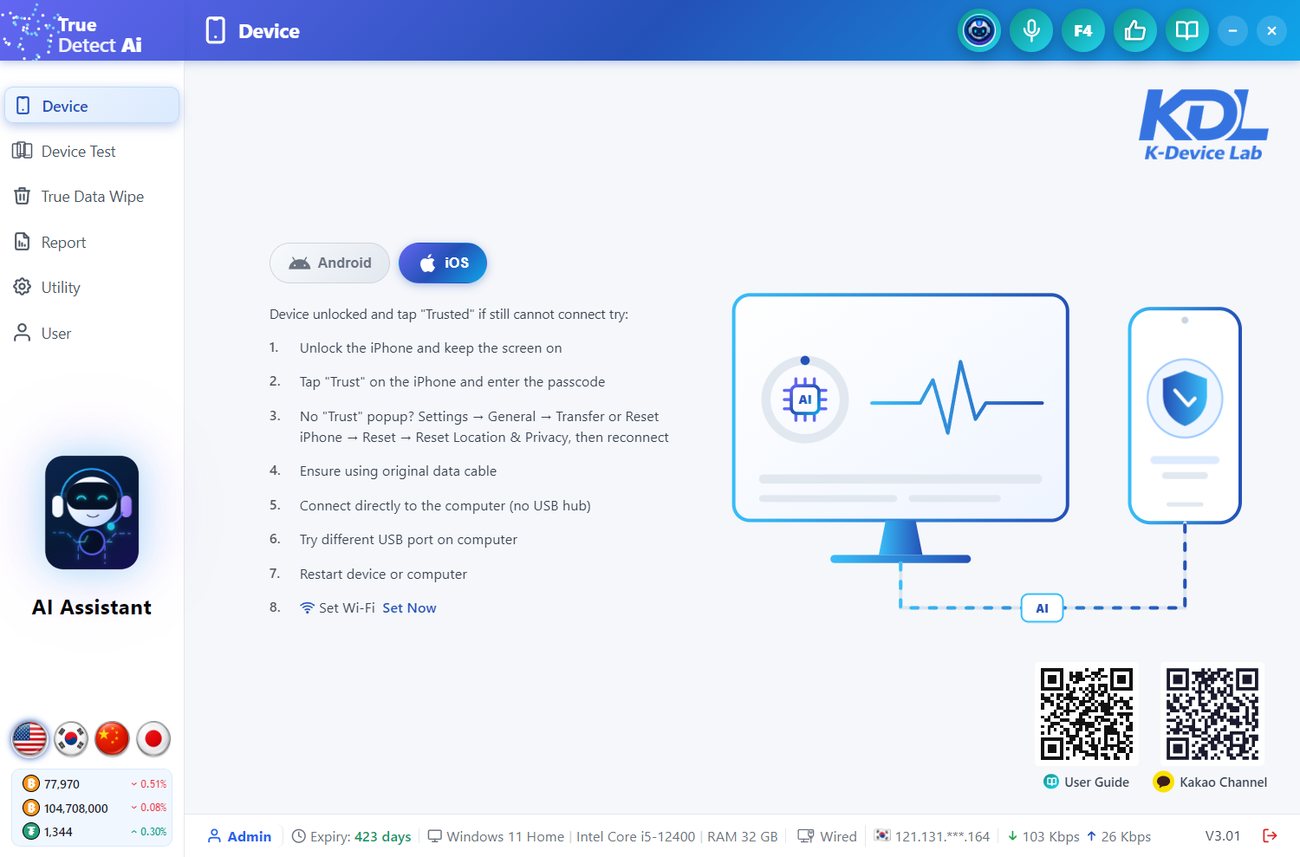
With no phone on the cable, the Device page shows how to connect. Pick the Android or iPhone tab.

Android

Connection steps for Android.
  1. Unlock the phone. Turn Auto Blocker OFF (Samsung: Settings β–Έ Security and privacy).
  2. Turn on USB debugging: Settings β–Έ About phone β–Έ Software information β–Έ tap Build number 7 times, then Developer options β–Έ USB debugging.
  3. Use the original data cable and try another USB port if nothing happens.
  4. If a driver is missing, click Fix Drivers.
  5. Still nothing? Restart the phone or the PC.

iPhone

Connection steps for iPhone.
  1. Unlock the iPhone and keep the screen on.
  2. Tap Trust on the iPhone and enter the passcode.
  3. Use the original cable, connect directly (no hub), try another port.
  4. Click Fix Drivers if the Apple driver is missing, or restart.

While the phone is read, a progress bar shows Device Connecting.... Reading takes a few seconds.

Messages you may see while connecting

MessageWhat to do
Enable USB DebuggingTurn on USB debugging on the Android phone and allow this PC.
Auto Blocker is blocking data accessTurn Auto Blocker off on the Samsung phone.
Device Info Not LoadedThe screen is locked, or a new phone has not finished the setup screens. Unlock it / finish setup.
Please Trust This ComputerTap Trust on the iPhone, then click Re-check.
Another tool is holding the phoneClose the other phone program, or use USB Release.
Coming SoonThis phone brand / page is not supported yet.
← PreviousThe main screenNext β†’Device page - iPhone
πŸ“±
CHAPTER 06

Device page - iPhone

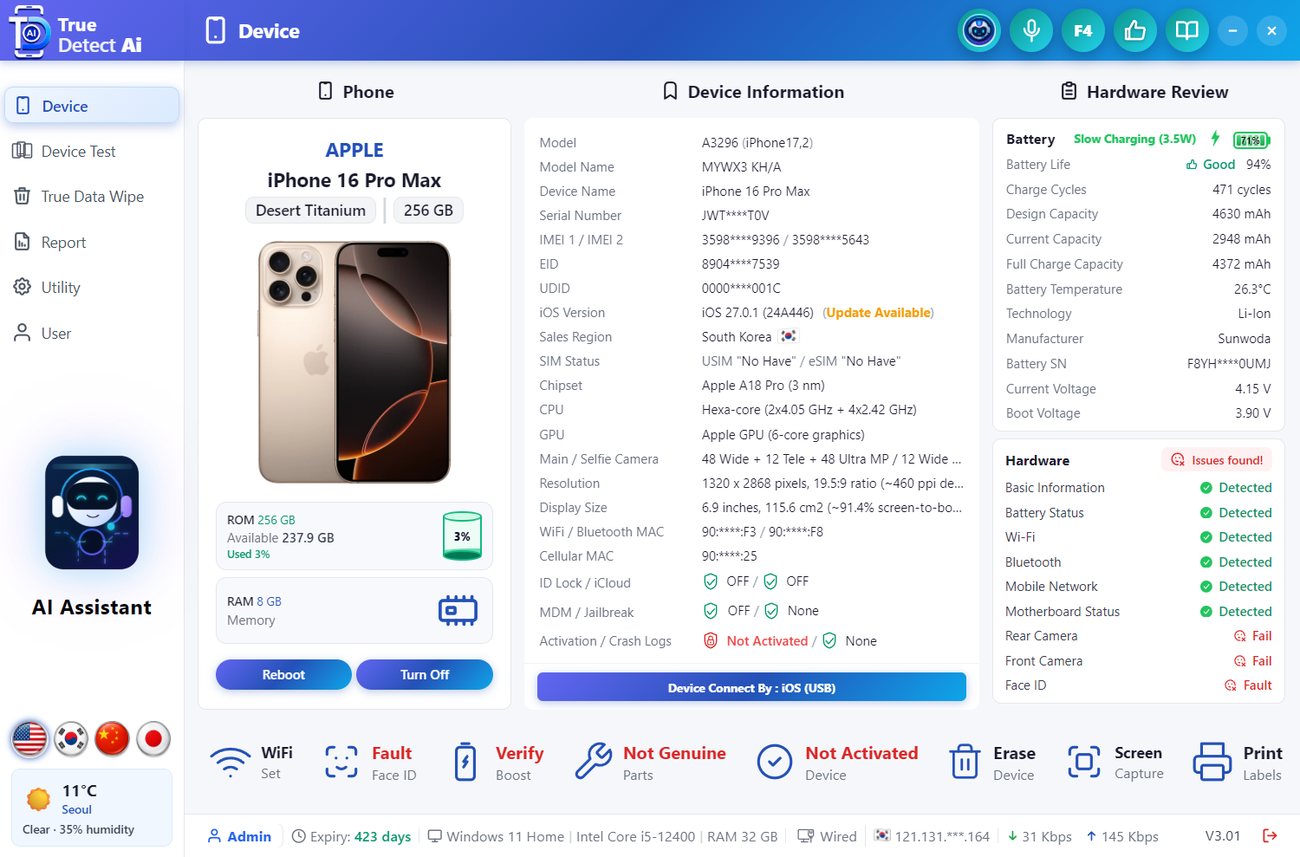
Plug an iPhone in. In a few seconds the page shows the phone, all its information, the battery and the hardware review.

Device page with an iPhone (IMEI and serial are partly hidden in this guide).

The three columns

AreaWhat you see
PhoneBrand, model, colour, storage and photo. ROM (used / free) and RAM. Buttons Reboot and Turn Off.
Device InformationModel, model name, serial, IMEI 1 / 2, EID, UDID, iOS version (shows Update Available when newer iOS exists), sales region / carrier (with the country flag), SIM (a dual nano-SIM model shows USIM 1 / USIM 2, and its EID shows Not Supported), chipset, CPU / GPU, cameras, screen, MAC addresses, ID Lock / iCloud, MDM / Jailbreak, Activation / Crash Logs.
Hardware ReviewBattery: health, charge cycles, design / current / full-charge capacity, temperature, maker, battery serial, voltage. Below: each part - Detected (OK) or Fail / Fault.
Click any value in Device Information to copy it.
ID Lock / iCloud: ON means the phone is still linked to an Apple ID. It cannot be sold as clean until the owner removes it.

Action bar (bottom of the page)

TileWhat it does
WiFi SetSet the Wi-Fi the phones use.
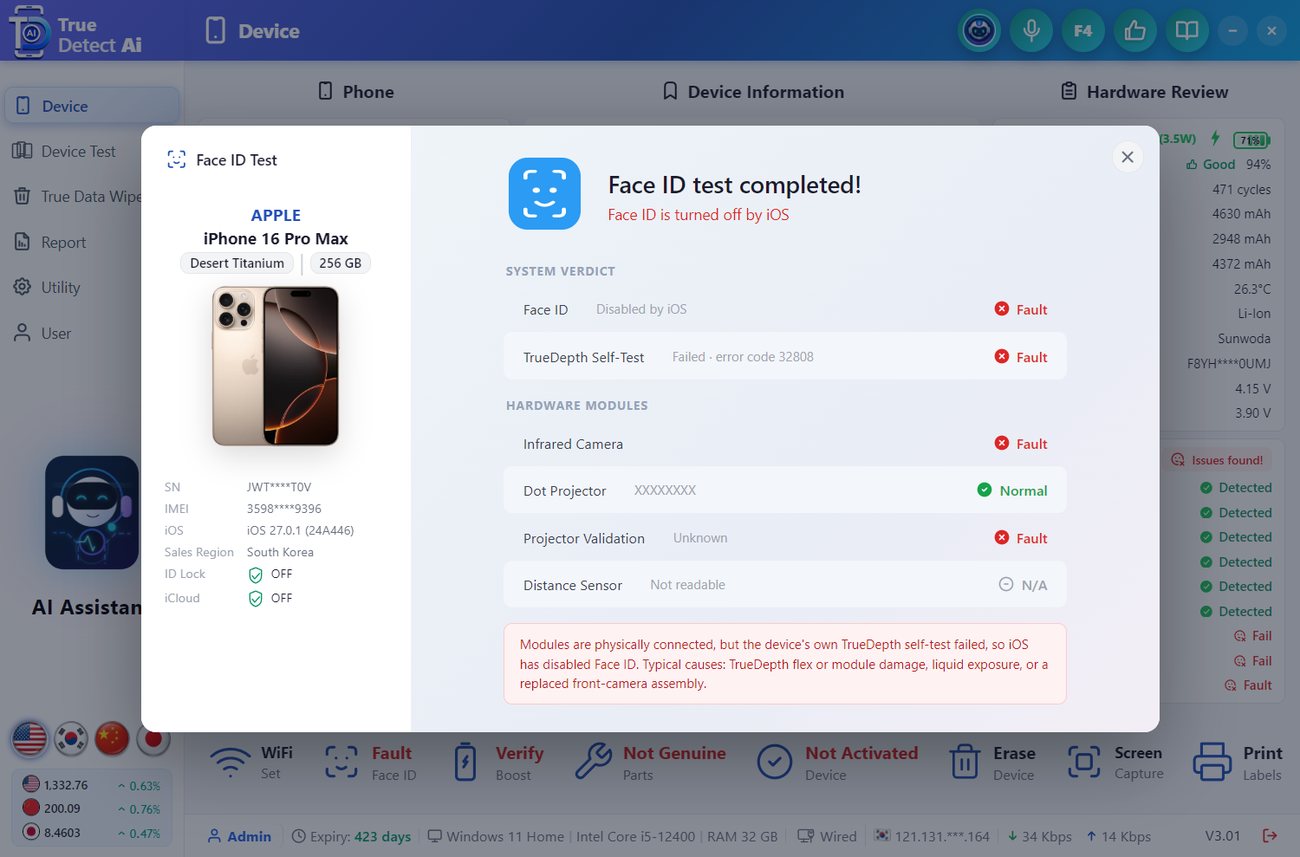
Face IDOpens the Face ID test (Touch ID phones: Fingerprint test). The tile shows the result.
BoostBattery Boost Check - is the battery genuine and is its health number real?
PartsParts Check - is each part original or changed?
Activate DeviceActivate / deactivate many iPhones. See Activate & Erase.
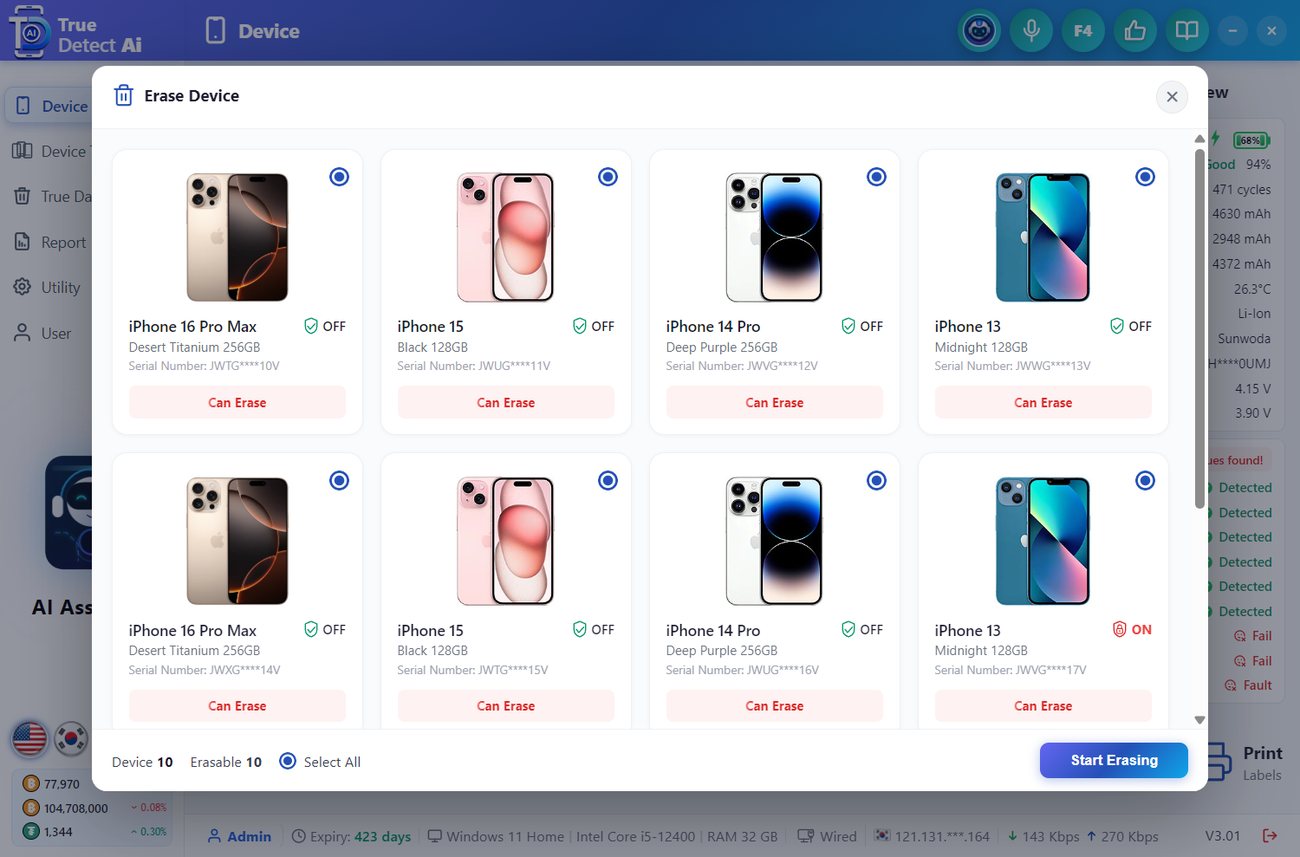
Erase DeviceErase many iPhones at once.
Screen CaptureSave a screenshot of the iPhone screen to the PC.
Print LabelsOpen the label settings. See Print Labels.

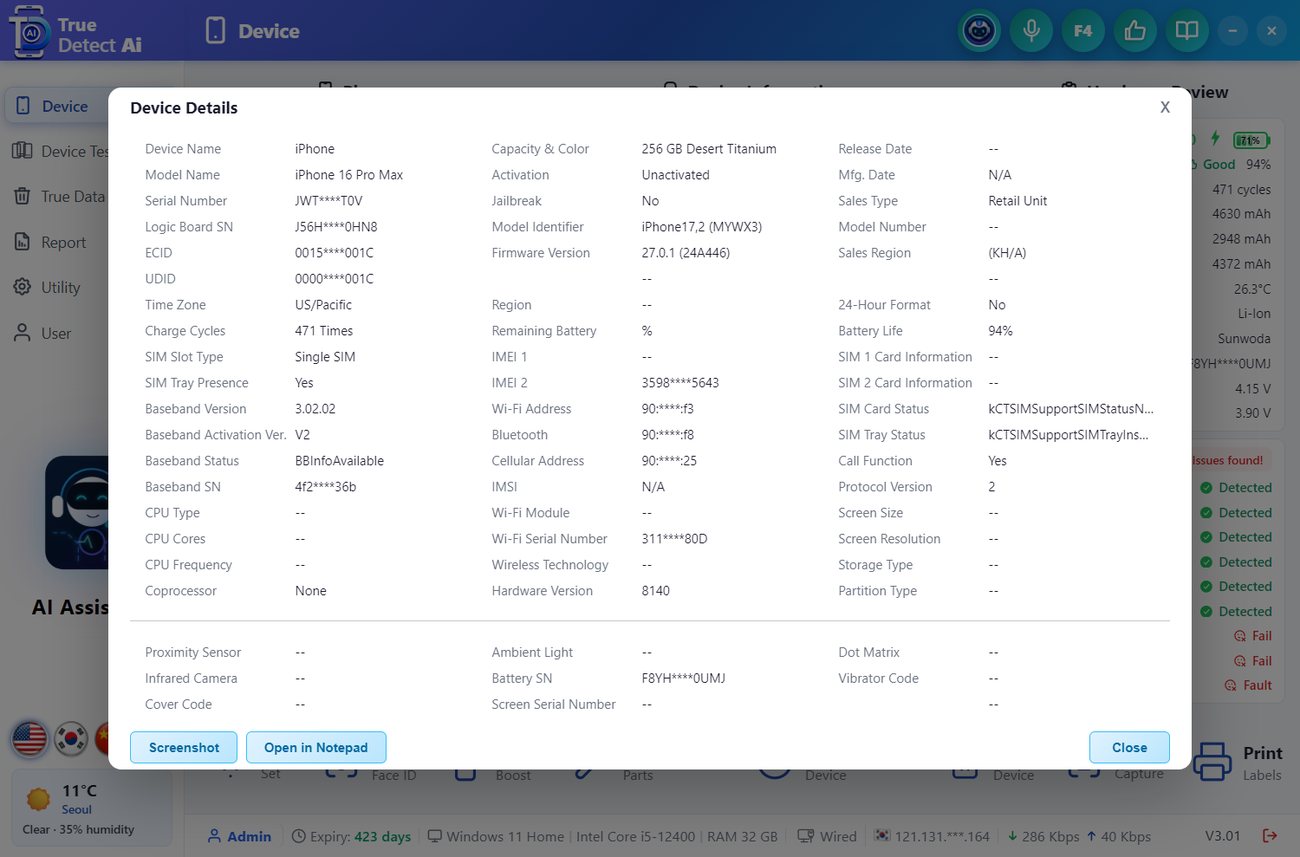
View Device Details

Device Details - the full list of values read from the iPhone.

Click View Device Details under the information table. Use Screenshot to save it as a picture or Open in Notepad to keep it as text.

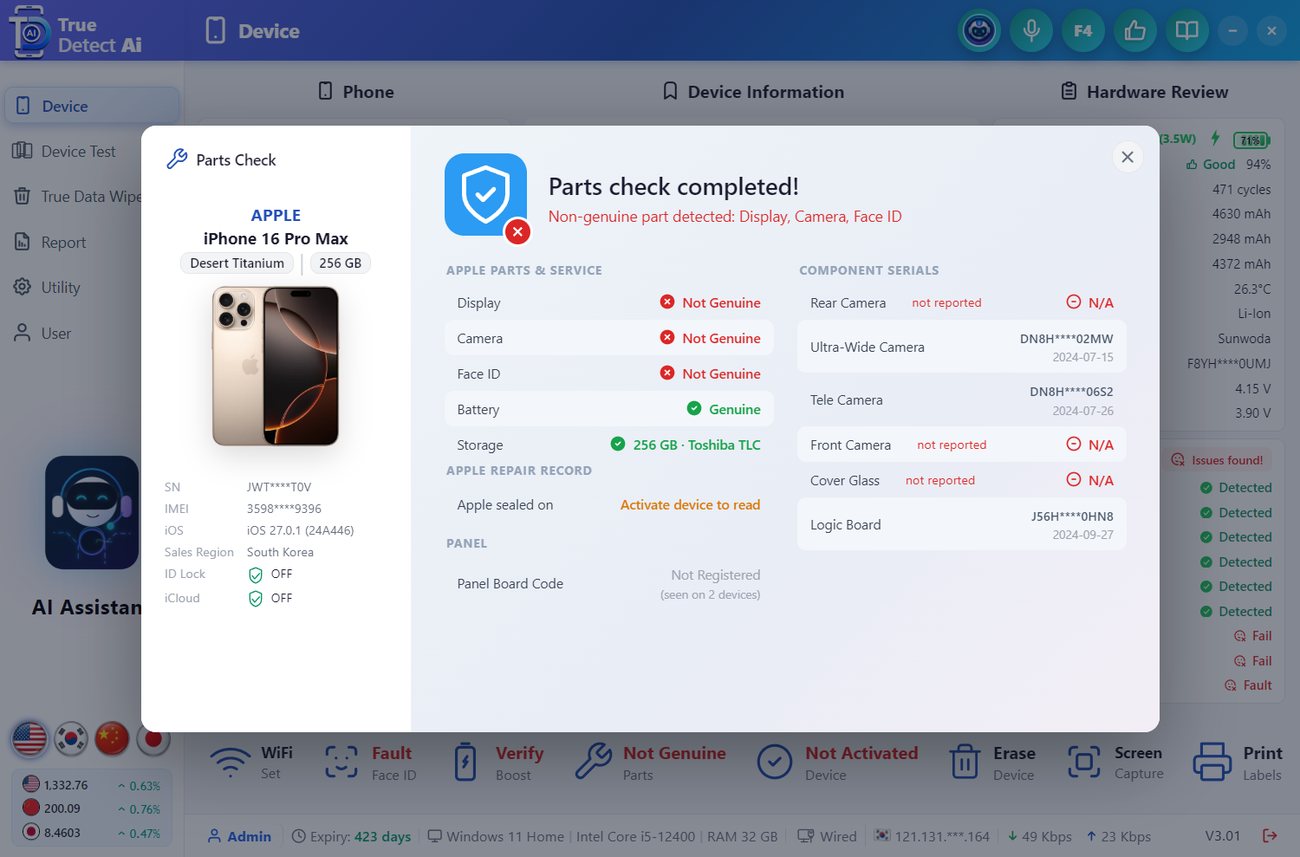
Parts Check

Parts Check - a phone with changed parts.
  1. Click Parts in the action bar. The check takes a few seconds.
  2. Apple Parts & Service: Display, Camera, Face ID, Battery, Cover Glass, Storage - each Genuine or Not Genuine / Changed.
  3. Apple Repair Record: parts that were replaced, with the original serial number when Apple stores it.
  4. Component Serials: the serial of each camera, cover glass and logic board. N/A means the phone does not report it - the tool never guesses a value.

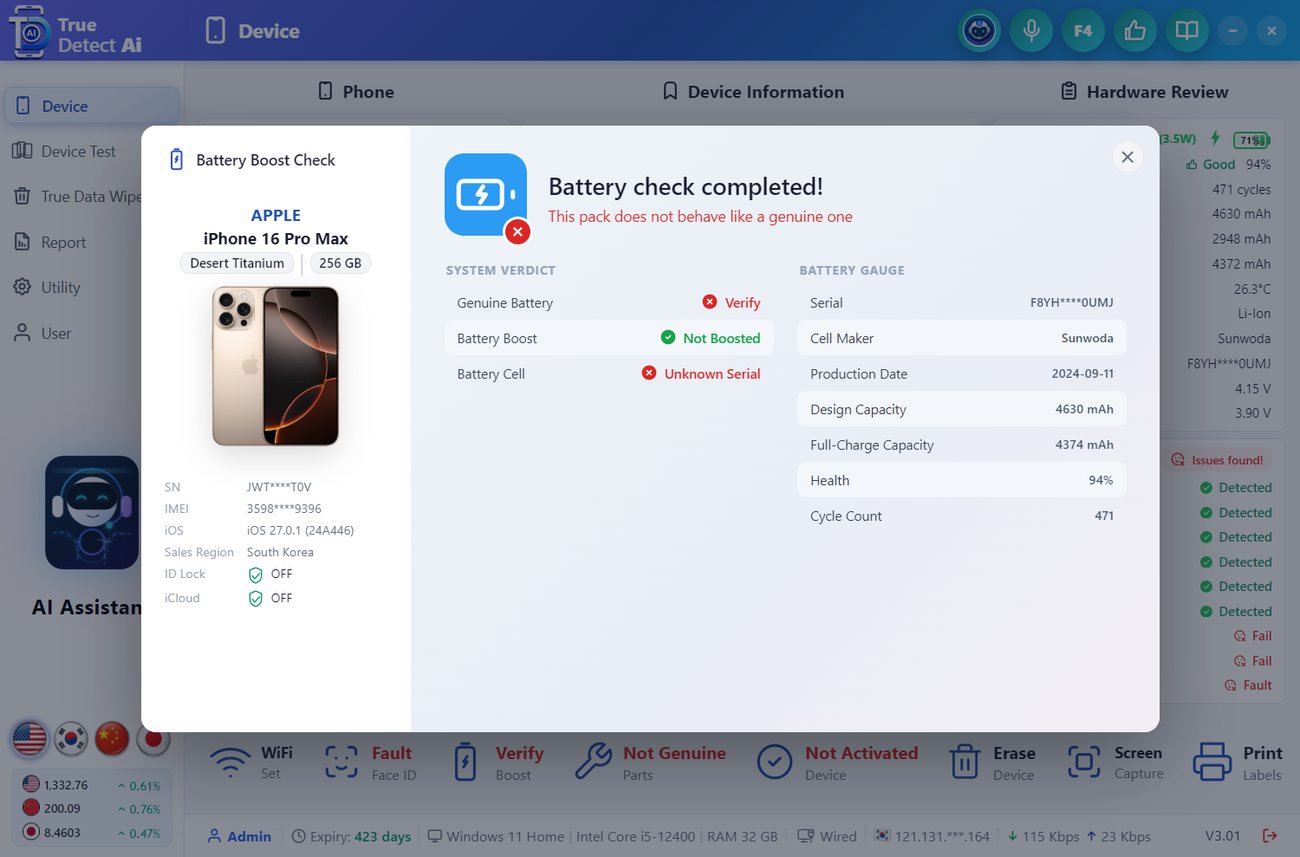
Battery Boost Check

Battery Boost Check.

Some sellers "boost" a battery so the Settings app shows a higher health than the real one. This check compares the two:

Face ID test

Face ID test.

Click Face ID and follow the steps on the screen and on the iPhone. The result is shown on the tile and in the hardware review.

← PreviousConnect a phoneNext β†’Device page - Android
πŸ€–
CHAPTER 07

Device page - Android

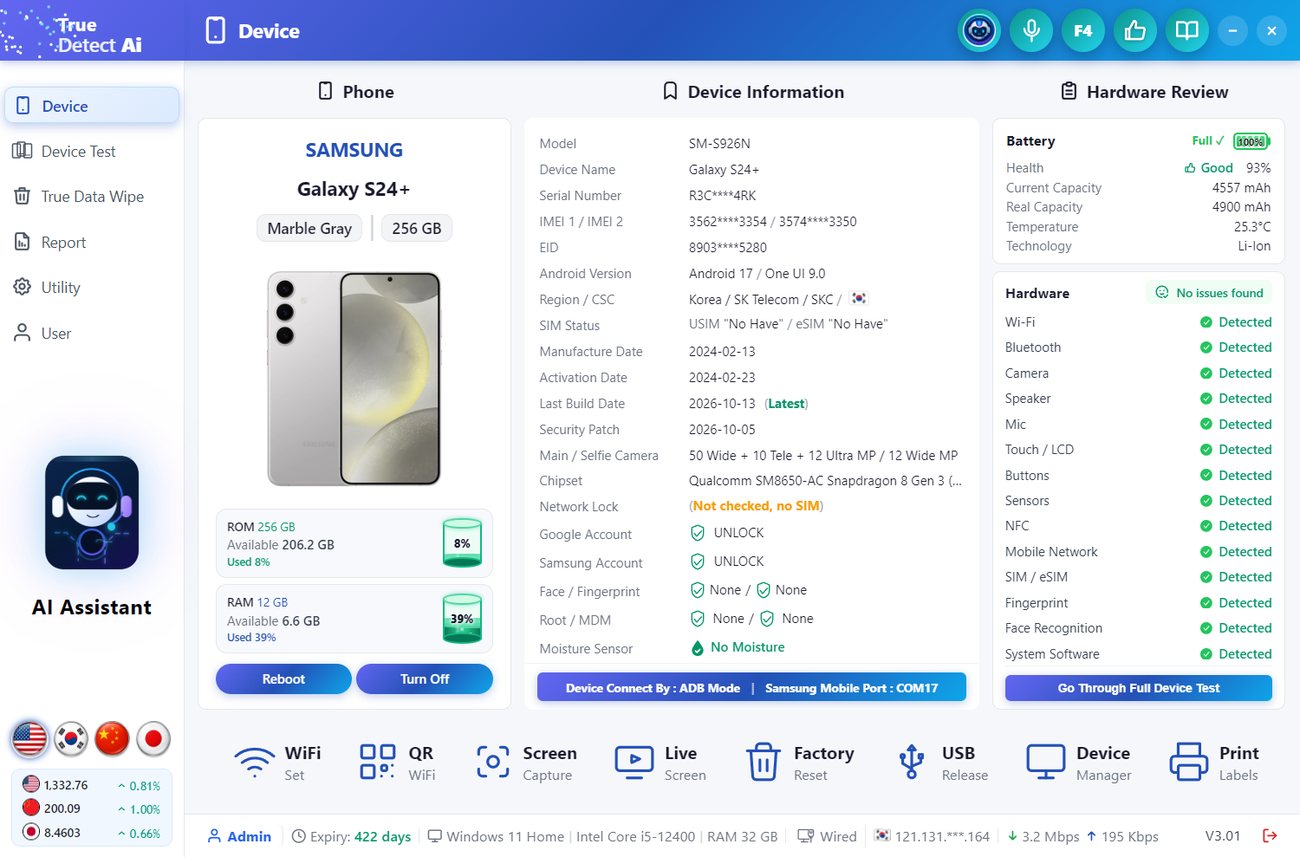
For Samsung and other Android phones the Device page shows the same three columns, with Android values.

Device page with an Android phone (IMEI and serial are partly hidden in this guide).

What is shown

AreaWhat you see
PhoneBrand, name, colour, storage, chipset, RAM, ROM / RAM usage rings. Buttons Reboot and Turn Off (in MTP mode also Download Mode).
Device InformationModel, device name, serial, IMEI 1 / 2, EID, Android version, Region / CSC (with the country flag), SIM status, manufacture date, activation date, last build date, security patch, chipset, cameras, Network Lock, Google Account, Samsung Account, Face / Fingerprint, Root / MDM, moisture sensor.
BatteryHealth, current capacity, real capacity, temperature and technology. More rows (charge cycles, maker, battery serial, voltage) appear only when the phone reports them.
HardwareWi-Fi, Bluetooth, Camera, Speaker, Mic, Touch / LCD, Buttons, Sensors, NFC, Mobile Network, SIM / eSIM, Fingerprint, Face Recognition, System Software. Go Through Full Device Test opens Device Test.
Google Account: LOCK means FRP is on. Remove the Google account before selling, or the next user cannot set up the phone.

Action bar

TileWhat it does
WiFi SetSet the Wi-Fi the phones use.
QR WiFiOpen QR Provision (Wi-Fi / setup QR for phones without a cable).
Screen CaptureSave a screenshot of the phone. A message shows where the file is saved.
Live ScreenShow the phone screen live on the PC.
Factory ResetErase the phone. See Erase.
USB ReleaseStop other phone programs that hold the phone, then attach it again.
Device ManagerOpen Windows Device Manager.
Print LabelsOpen the label settings.

At the bottom of the information table the connection pill shows the mode (ADB or MTP) and the Samsung COM port.

← PreviousDevice page - iPhoneNext β†’Activate & Erase (many iPhones)
⚑
CHAPTER 08

Activate & Erase (many iPhones)

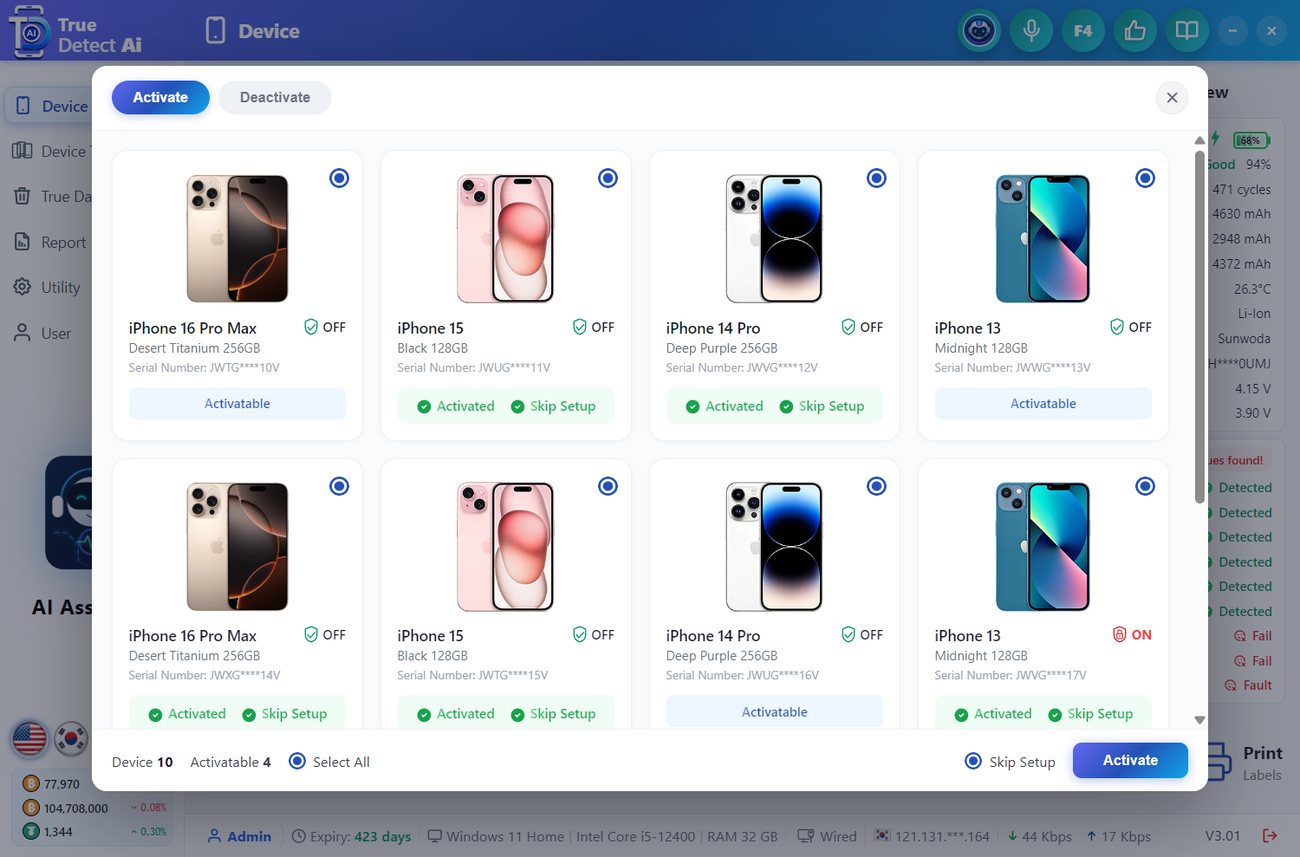
Connect several iPhones to the PC. One window shows all of them, so you can activate, deactivate or erase them together.

1 Activate

Activate - one card per connected iPhone.
  1. Click Activate Device on the Device page.
  2. Each card shows the photo, model, colour, storage, serial and the iCloud state (OFF green / ON red).
  3. Badges: Activatable (blue) = can be activated Β· Activated + Skip Setup (green) = done Β· red = locked.
  4. Click cards to choose them, or Select All. Phones that are locked to iCloud are not ticked.
  5. Turn on Skip Setup to skip the iPhone setup screens after activation.
  6. Click Activate. The list updates by itself every 2 seconds.

The footer counts Device (connected) and Activatable.

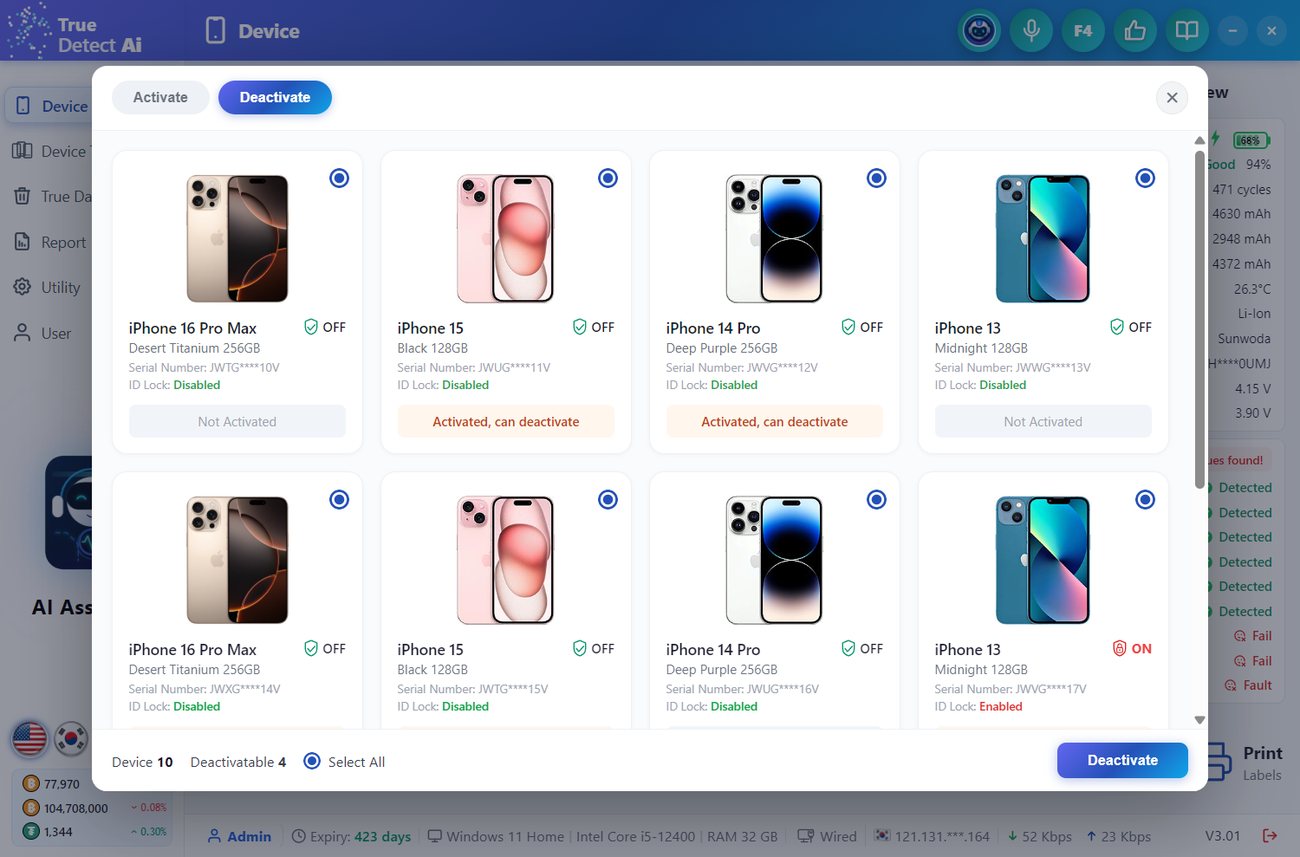
2 Deactivate

Deactivate tab.

Click the Deactivate tab at the top, choose the phones and click Deactivate. Each card shows whether ID Lock is enabled.

3 Erase

Erase Device.
  1. Click Erase Device on the Device page (Android: Factory Reset).
  2. The footer shows how many phones are connected and how many are Erasable.
  3. Choose the phones, then click Start Erasing.
Erase deletes everything on the phone and cannot be undone. Check you chose the right phones.
← PreviousDevice page - AndroidNext β†’Print Labels (F4)
🏷️
CHAPTER 09

Print Labels (F4)

Print a small label with a QR code and the phone's main data. Press F4 to print the phone on the cable at once.

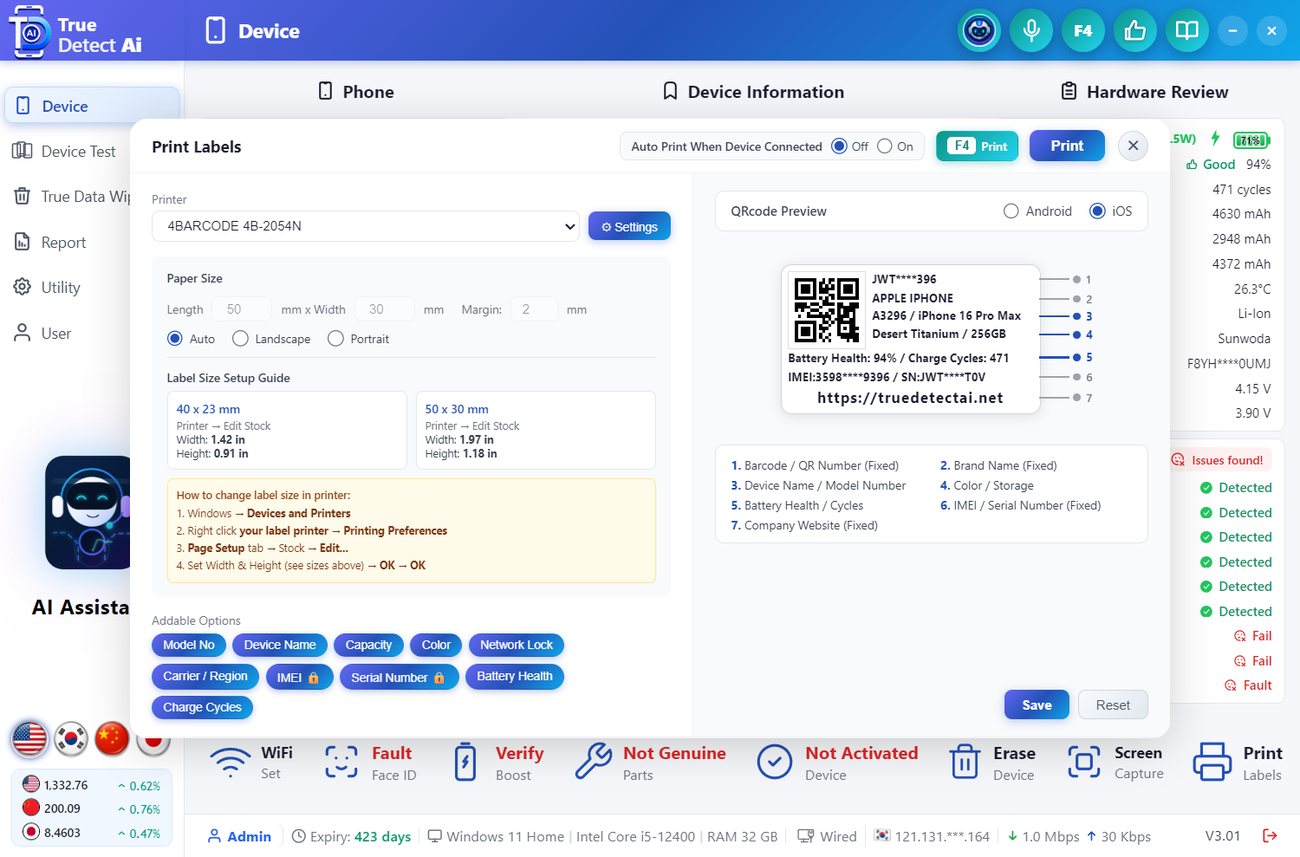
Print Labels - iPhone preview.
  1. Open Print Labels from the Device page, Utility, or the printer button in the header.
  2. Printer: choose your label printer. Settings opens the Windows printer settings.
  3. Paper Size: length, width, margin and Auto / Landscape / Portrait.
  4. QRcode Preview: choose Android or iOS to see that label. The numbers 1-7 explain each line.
  5. Addable Options: click an option to add or remove that line (Model No, Device Name, Capacity, Color, Network Lock, Carrier / Region, IMEI, Serial Number, Battery Health, Charge Cycles...).
  6. Click Save. Reset returns to the default label.
  7. Turn on Auto Print When Device Connected to print each phone the moment it is read.
#iPhone label line
1QR code / barcode with the QR number
2Brand (APPLE IPHONE / IPAD / WATCH)
3Model number / model name
4Colour / storage
5Battery health / charge cycles
6IMEI / serial number
7Company website (fixed)

Android label

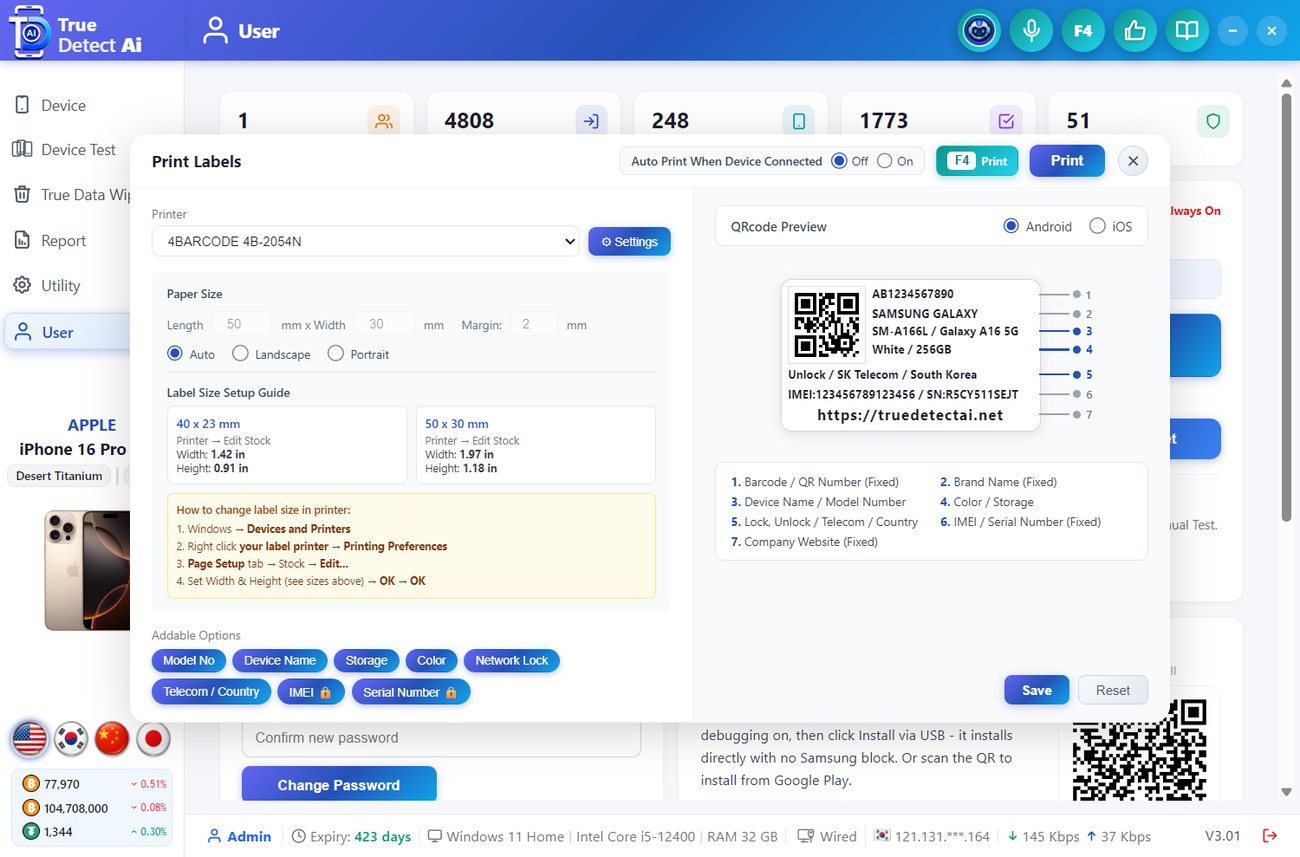
Android preview.

The Android label shows model and name, colour / storage, IMEI, and the lock state with carrier and country (for example Unlock / SK Telecom / South Korea).

Label size in the printer

Two sizes are ready: 40 Γ— 23 mm and 50 Γ— 30 mm. Set the same size in Windows: Devices and Printers β–Έ right-click your label printer β–Έ Printing Preferences β–Έ Page Setup β–Έ Edit β–Έ width and height β–Έ OK.

← PreviousActivate & Erase (many iPhones)Next β†’Device Test (many phones)
πŸ§ͺ
CHAPTER 10

Device Test (many phones)

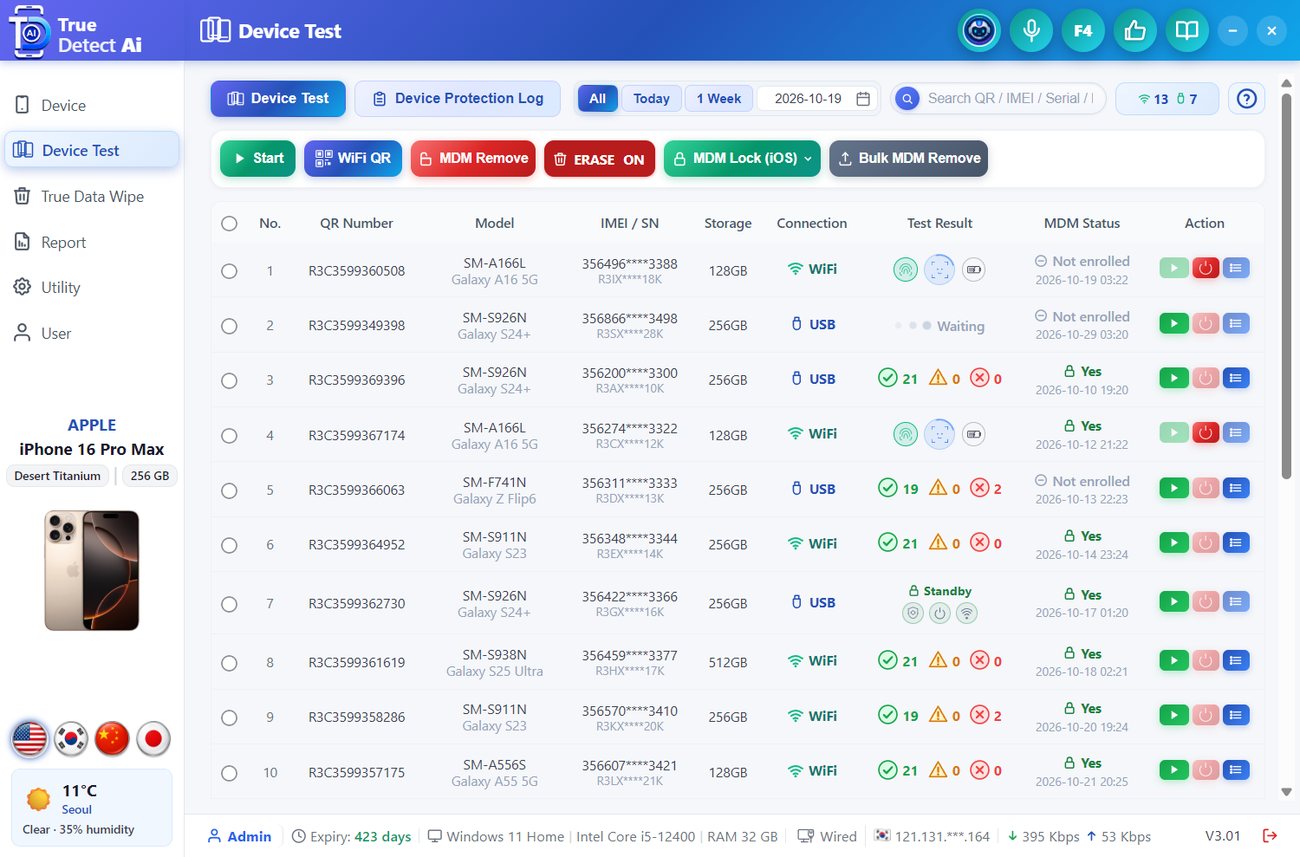
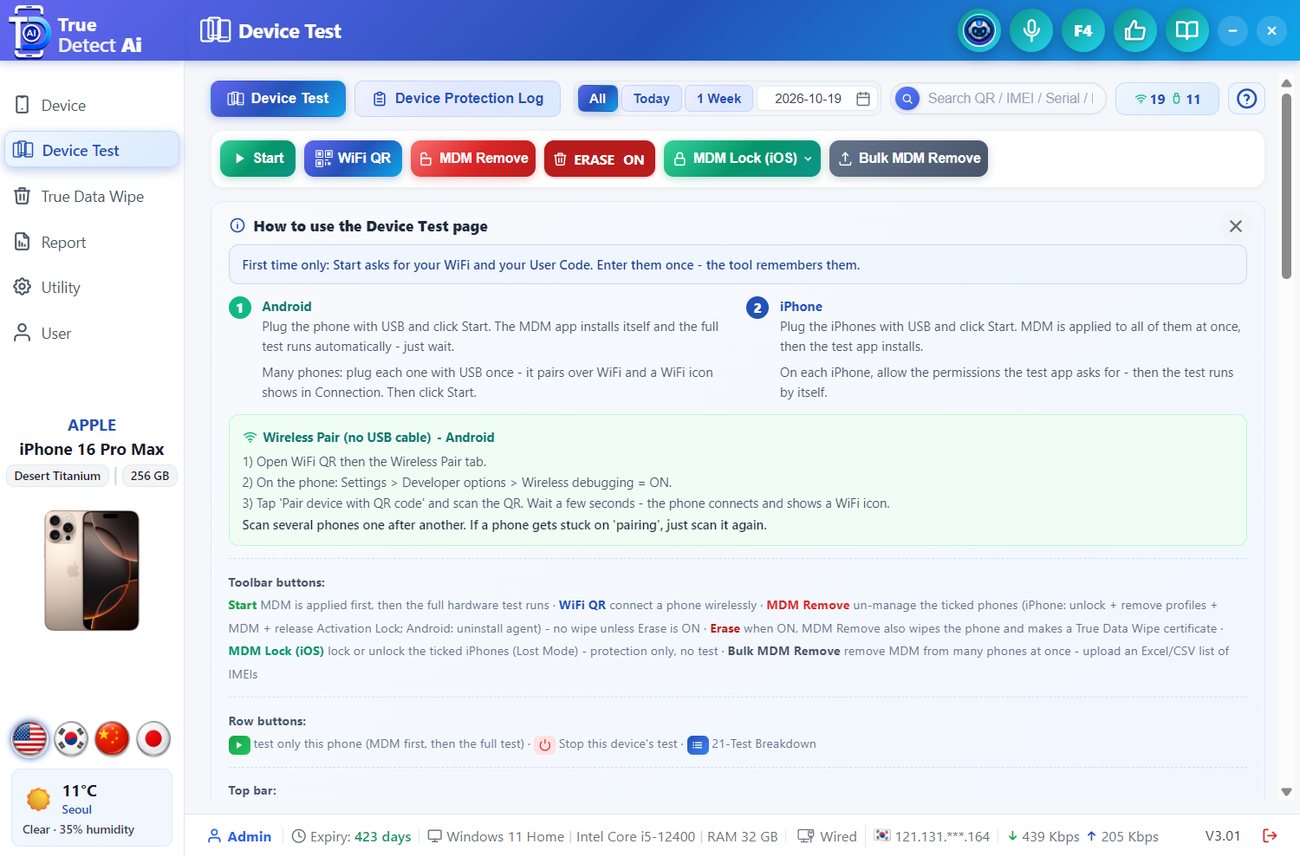
Device Test shows every phone on USB or Wi-Fi in one table. Run the 21 hardware tests on all of them, apply MDM, and see each result.

Device Test with many phones (sample data).

Top of the page

Toolbar

ButtonWhat it does
StartTest the ticked phones (all phones if none are ticked).
WiFi QRShow a QR so phones join the Wi-Fi or pair without a cable.
MDM RemoveRemove MDM from the ticked phones. The phone data stays, unless ERASE is ON.
ERASE OFF / ONWhen ON, MDM Remove also erases the phone.
MDM Lock (iOS)Lock Selected iOS / Unlock Selected iOS.
Bulk MDM RemoveUpload an Excel / CSV list of IMEIs to remove MDM from many phones.
Result RemoveClear the results of the ticked phones so you can test again.
All DisconnectDisconnect the ticked phones (or all). A protected phone stays connected.

Table

Columns: No., QR Number, Model, IMEI / SN, Storage, Connection (USB / WiFi), Test Result (βœ“ pass Β· ⚠ warn Β· βœ• fail counts), MDM Status and Action.

ActionUse
β–Ά TestTest this one phone. MDM is applied first, then the full test runs.
⏻ StopStop the running test of this phone.
☰ DetailOpen the test breakdown, device info and certificate.

How to test a batch

Device Test - How to Use.
  1. Set your Wi-Fi first (see First setup). Every phone uses it to report back.
  2. Connect the phones with USB cables. Each phone appears as a new row.
  3. Press Start. All 21 tests run on each phone.
  4. When a row is done, the counts show in Test Result. Click Detail for the full list.
Battery should be 25% or more. Vibration, Touch / LCD and Mic need a person to check on the phone.
iPhone not supervised? The tool shows Erase needed before it can apply MDM. Erase the iPhone, then test again.

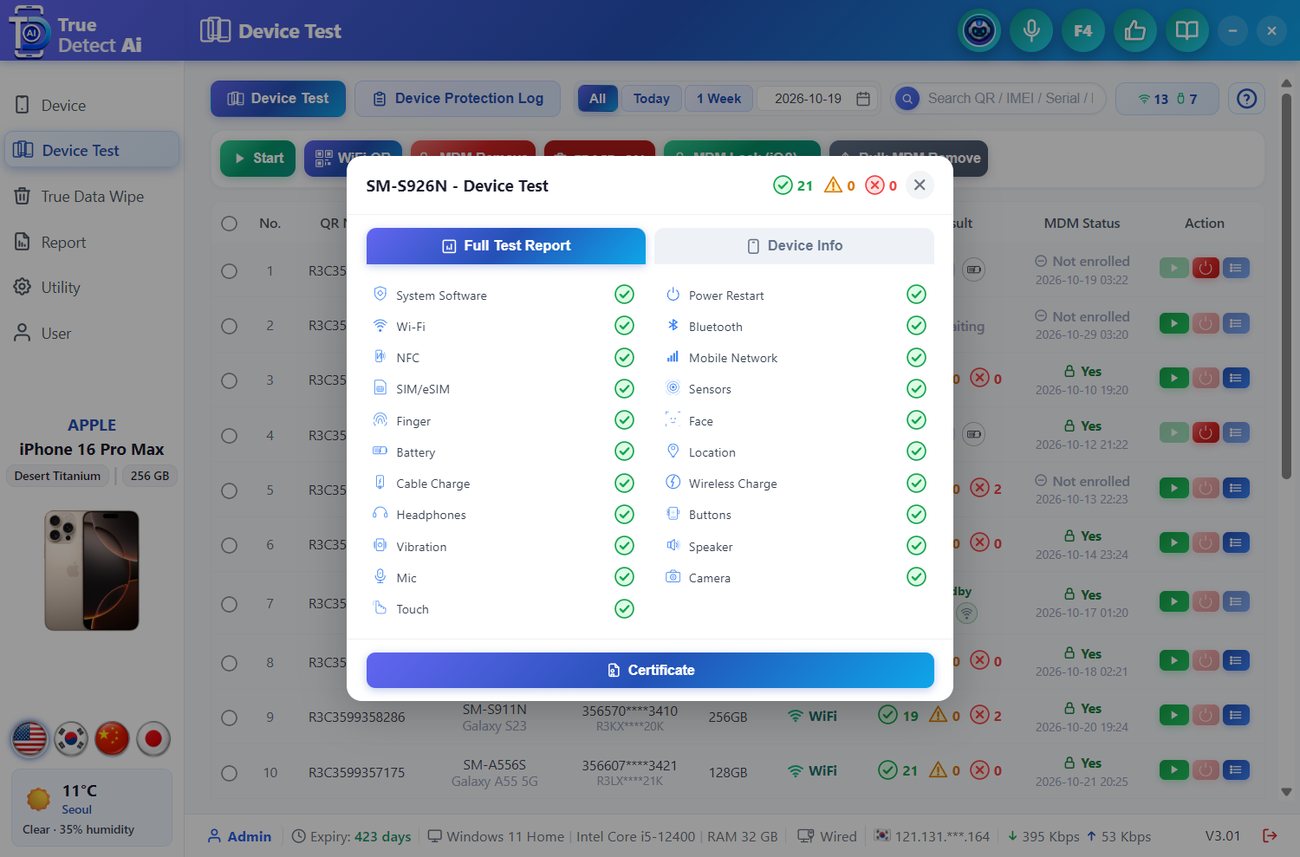
Test result detail

Full Test Report.

Full Test Report lists all 21 tests with βœ“ / ⚠ / βœ•. Device Info shows the phone's data. Certificate opens the test certificate you can print and send to the buyer.

The 21 tests

System Software Β· Power Restart Β· Wi-Fi Β· Bluetooth Β· NFC Β· Mobile Network Β· SIM / eSIM Β· Sensors Β· Fingerprint Β· Face Recognition Β· Battery Β· Location Β· Cable Charging Β· Wireless Charging Β· Wired Headphones Β· Buttons Β· Vibration Β· Speaker Β· Mic Β· Camera Β· Touch / LCD

A test the phone does not have (for example S-Pen) is skipped by itself. Choose which tests run on the User page β–Έ Test Functions.

← PreviousPrint Labels (F4)Next β†’Device Protection & MDM
πŸ›‘οΈ
CHAPTER 11

Device Protection & MDM

MDM keeps your phones under your control while they are with another company. If the buyer does not pay, you can lock the phone.

Apply MDM

  1. On Device Test, press Test on a row (or Start for many). MDM is applied first, then the test runs.
  2. The MDM Status column shows Yes with the date when the phone is protected.
  3. The phone uses your Wi-Fi to check in with the server. Your User Code unlocks it.

Remove MDM

  1. Tick the phones and click MDM Remove. Turn on ERASE first if the phones must also be wiped.
  2. For a long list, use Bulk MDM Remove and upload an Excel / CSV of IMEIs.

Lock / unlock iPhones

Tick the iPhones, open MDM Lock (iOS) and choose Lock Selected iOS or Unlock Selected iOS.

Keep your User Code inside the company. Anyone who knows it can unlock your phones.

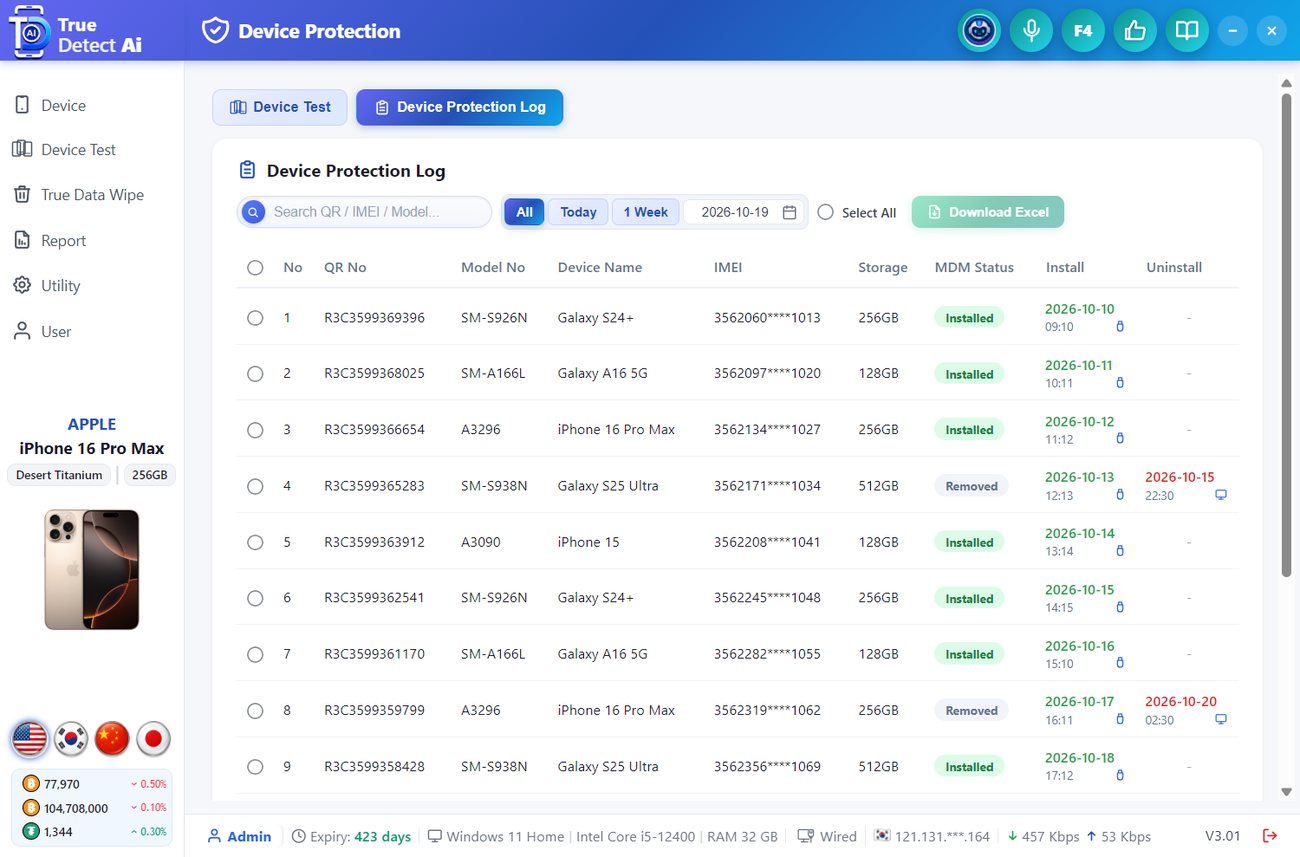
Device Protection Log

Device Protection Log (sample data).

Click Device Protection Log at the top of Device Test. It lists every protected phone: QR No, model, name, IMEI, storage, MDM Status (Installed / Removed), install date and uninstall date.

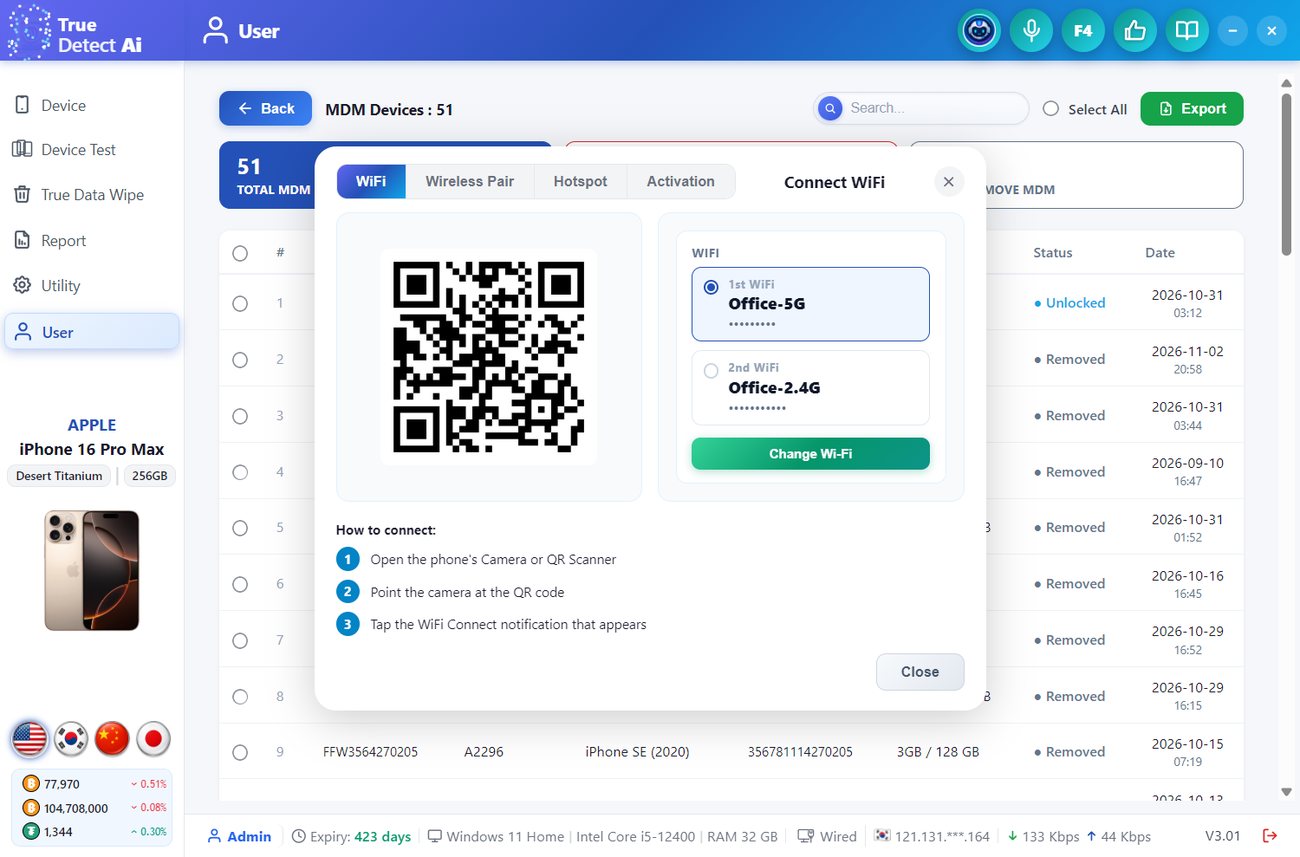
Wi-Fi QR (no cable)

Wi-Fi QR.

Tabs: WiFi (join Wi-Fi), Wireless Pair (connect without a cable), Hotspot and Activation. Choose the 1st or 2nd Wi-Fi, then scan the QR with the phone's camera and tap the Wi-Fi notification.

QR Provision (from Device Test β–Έ WiFi QR, or QR WiFi on Android) makes one QR that every reset phone can scan on its welcome screen: Skip Setup Wizard, or Skip Setup Wizard + MDM Lock + Testing. No USB is needed.

← PreviousDevice Test (many phones)Next β†’True Data Wipe
πŸ—‘οΈ
CHAPTER 12

True Data Wipe

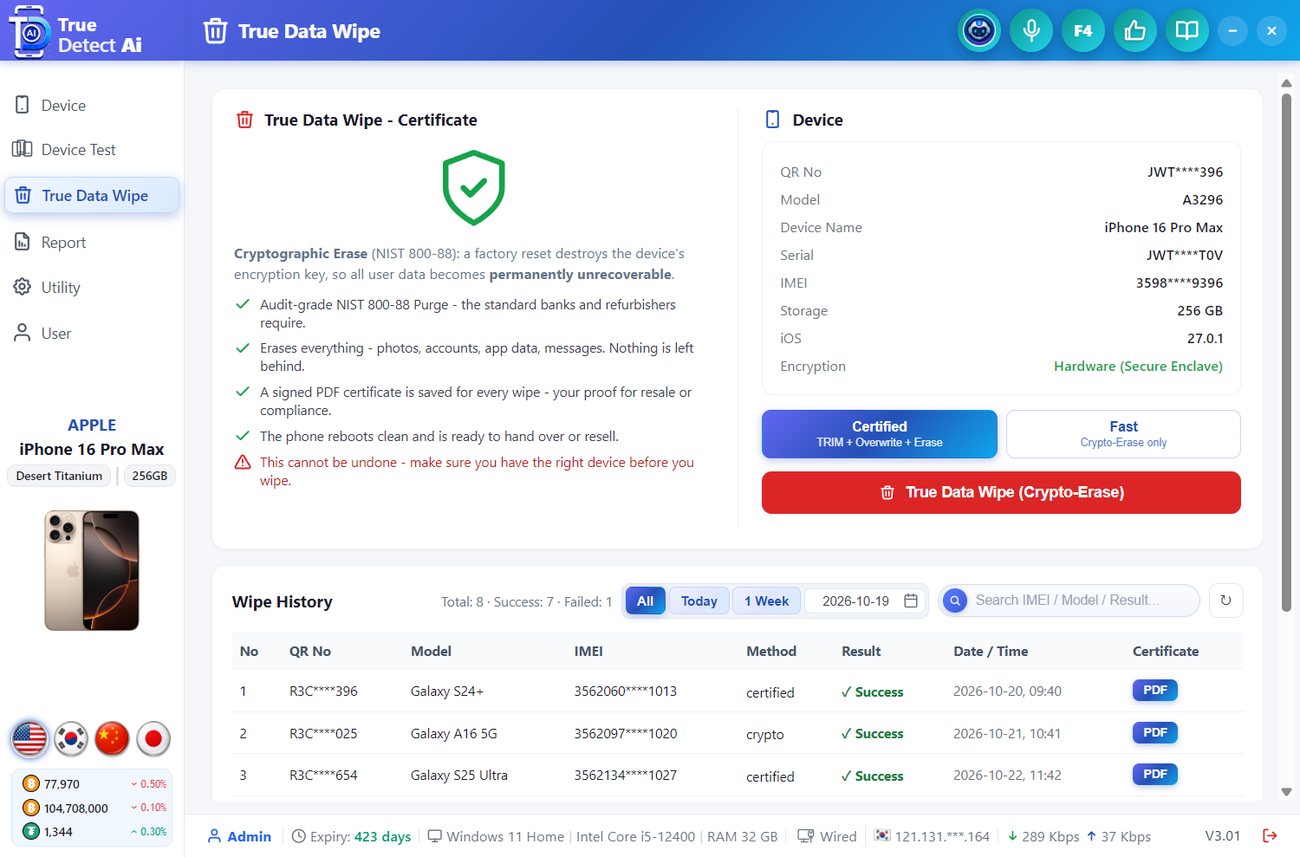
A certified erase (NIST 800-88). The phone's encryption key is destroyed, so the old data can never come back. A signed PDF certificate is saved for every wipe.

True Data Wipe (history is sample data).
  1. Connect the phone. The Device box shows its QR No, model, serial, IMEI, storage and encryption.
  2. Choose the method: Certified (TRIM + Overwrite + Erase) or Fast (Crypto-Erase only).
  3. Click True Data Wipe (Crypto-Erase).
  4. The tool checks the phone first. If a Google account, Samsung account or screen lock is still on, it shows Remove These First. Remove them and try again.
  5. A progress bar and timer show the wipe. The phone reboots clean.
This cannot be undone. Make sure you have the right phone.

Wipe History

Every wipe is listed with QR No, model, IMEI, method, result and date. Click PDF to open the certificate. Filter by date or search by IMEI / model / result.

← PreviousDevice Protection & MDMNext β†’Report & certificates
πŸ“„
CHAPTER 13

Report & certificates

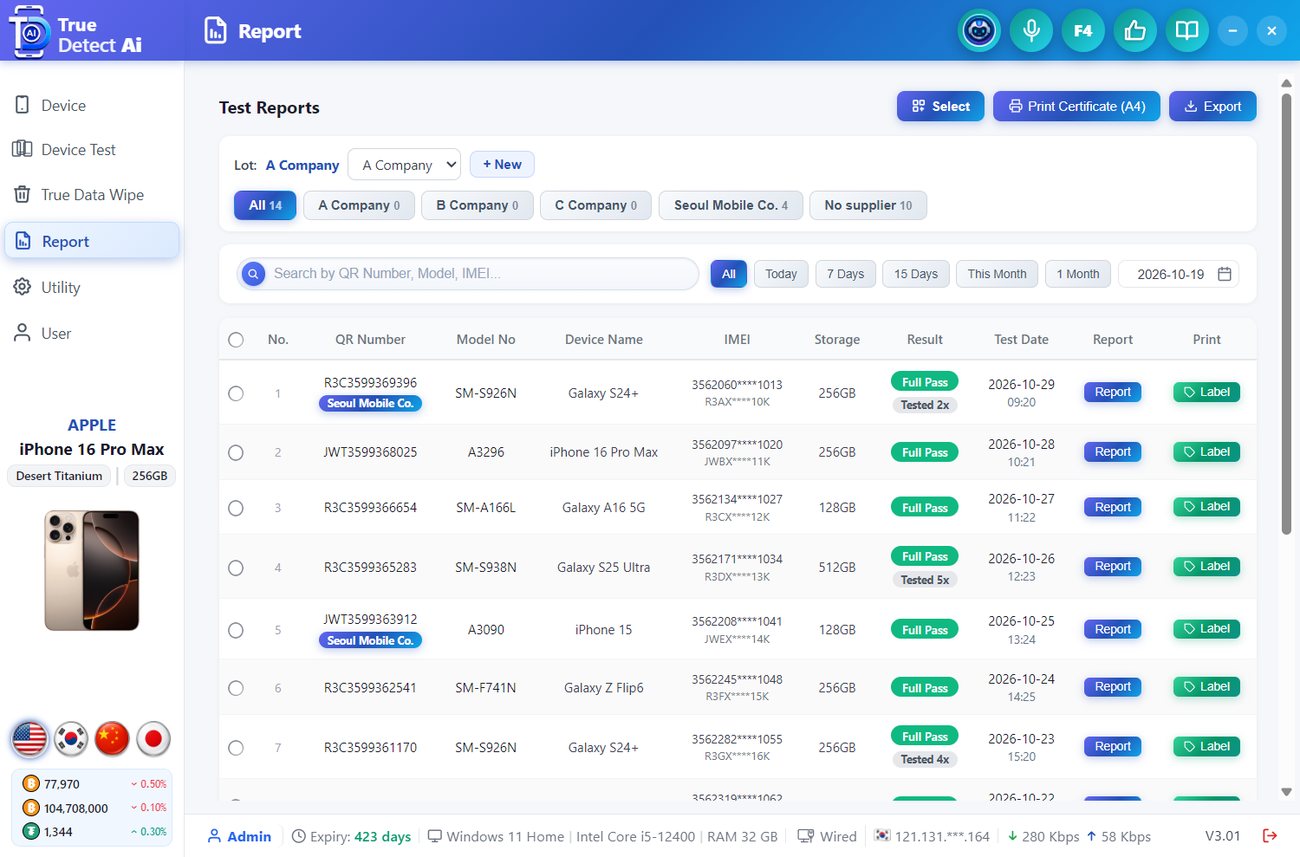
Every test is saved. Find any phone again, print its certificate or label, and export a list for the buyer.

Test Reports (sample data).
  1. Search by QR number, model or IMEI, or use the date buttons (All, Today, 7 Days, 15 Days, This Month, 1 Month, date).
  2. Lot: choose a supplier company (or + New). New reports are tagged with that company, so one batch stays together. Click a company chip to see only its reports.
  3. Each row shows the IMEI with the serial below it. A phone tested again keeps one row with the newest result, and a grey Tested 2x (3x...) tag shows under the result.
  4. Report opens the test certificate. Label prints the label again.
  5. Print Certificate (A4): click Select, tick the reports, then click it - one A4 certificate is printed for each ticked phone.
  6. Export makes an Excel file: Report only, or Company list (drop your own .xlsx / .xls / .csv list to match).
  7. Select lets you tick reports, then Report or Company (move them to another company).
The certificate is what the buyer checks before paying. Send it with the batch.
← PreviousTrue Data WipeNext β†’Smart Flash (firmware)
πŸ’Ύ
CHAPTER 14

Smart Flash (firmware)

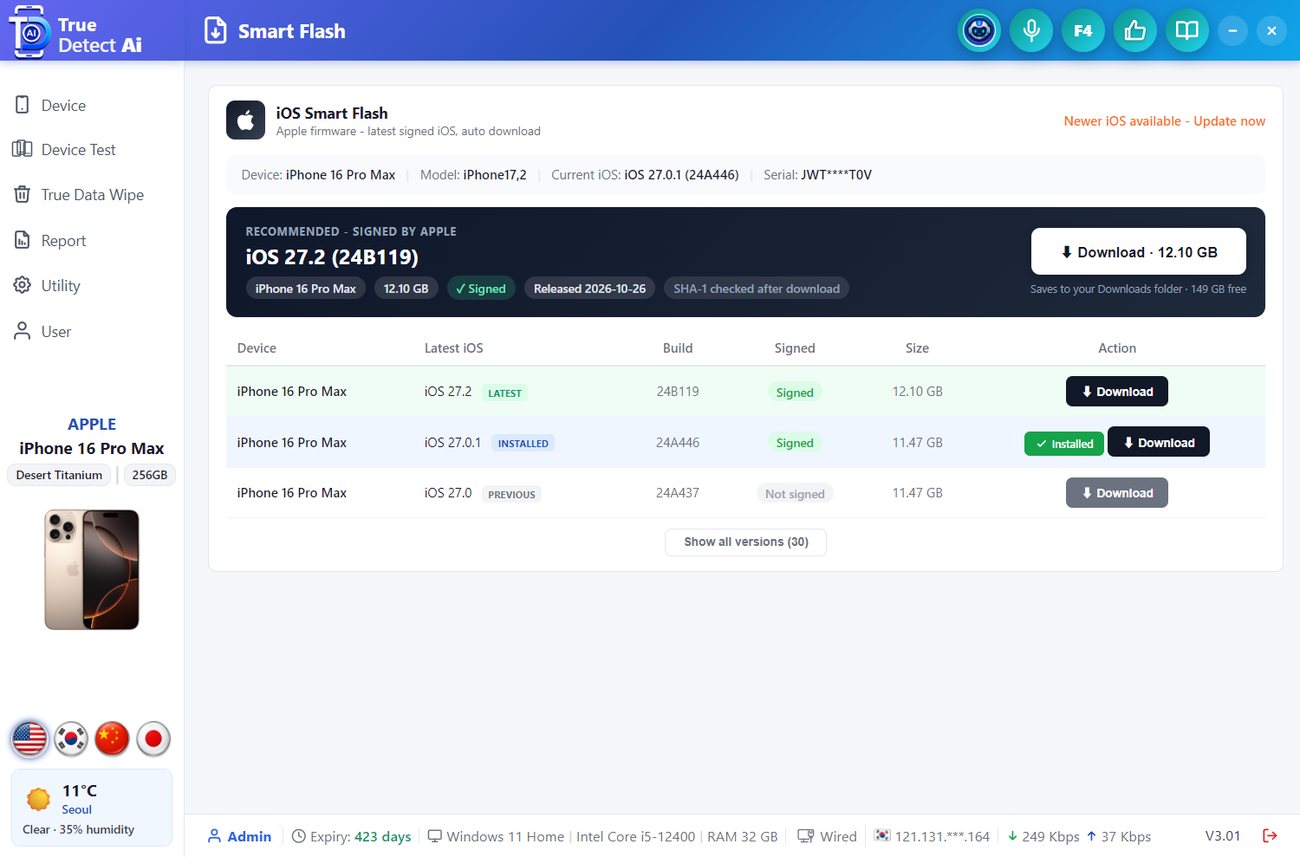
Open it from Utility β–Έ Smart Flash. The page changes for iPhone or Android.

iPhone

iOS Smart Flash.
  1. The top row shows the device, model, current iOS and serial.
  2. The Recommended card is the newest iOS that Apple still signs. Click Download. The file goes to your Downloads folder and is checked after download.
  3. The table lists other versions: Signed can be installed, Not signed cannot. Show all versions shows older ones.
  4. After download click Install on this iPhone and choose Update - keep all data or Erase - full restore.

Android (Samsung)

Flashing deletes all data. The wrong firmware can damage the phone - check the model and CSC first.
← PreviousReport & certificatesNext β†’Utility
🧰
CHAPTER 15

Utility

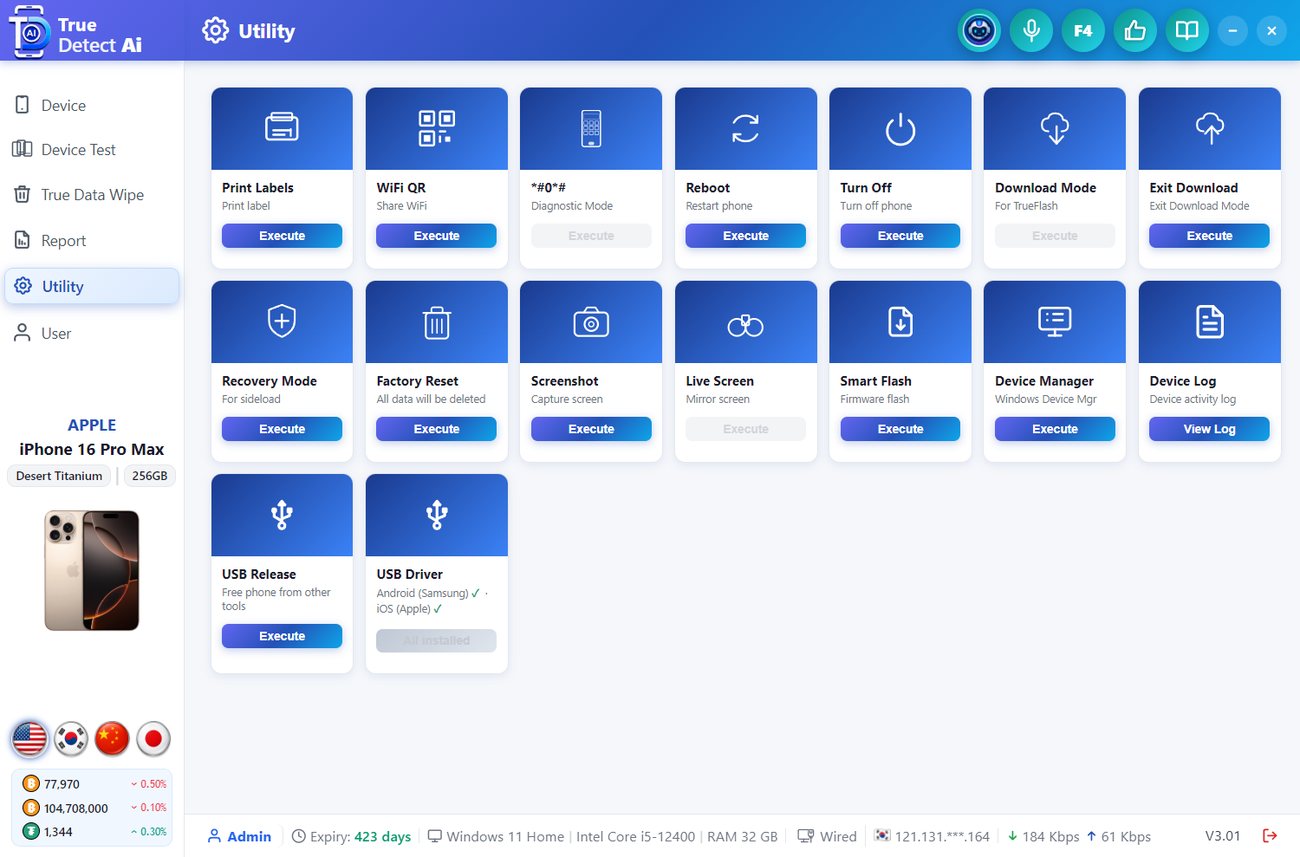
Quick tools for the connected phone. Each card has an Execute button. Cards that do not fit the phone (for example Android-only tools with an iPhone) are greyed out.

Utility.
CardWhat it does
Print LabelsOpen label settings.
WiFi QRShow the Wi-Fi QR.
*#0*#Open the Samsung diagnostic mode.
Reboot / Turn OffRestart or power off the phone.
Download Mode / Exit DownloadPut a Samsung phone in Download Mode for flashing, or bring it back.
Recovery ModeRestart into recovery.
Factory ResetErase the phone (all data deleted).
Screenshot / Live ScreenSave the phone's screen, or show it live.
Smart FlashOpen Smart Flash.
Device ManagerOpen Windows Device Manager.
Device LogView Log: connect, load time, functions and errors of this PC.
USB ReleaseFree the phone from other phone programs.
USB DriverCheck the Samsung and Apple drivers and install a missing one.

WiFi Set

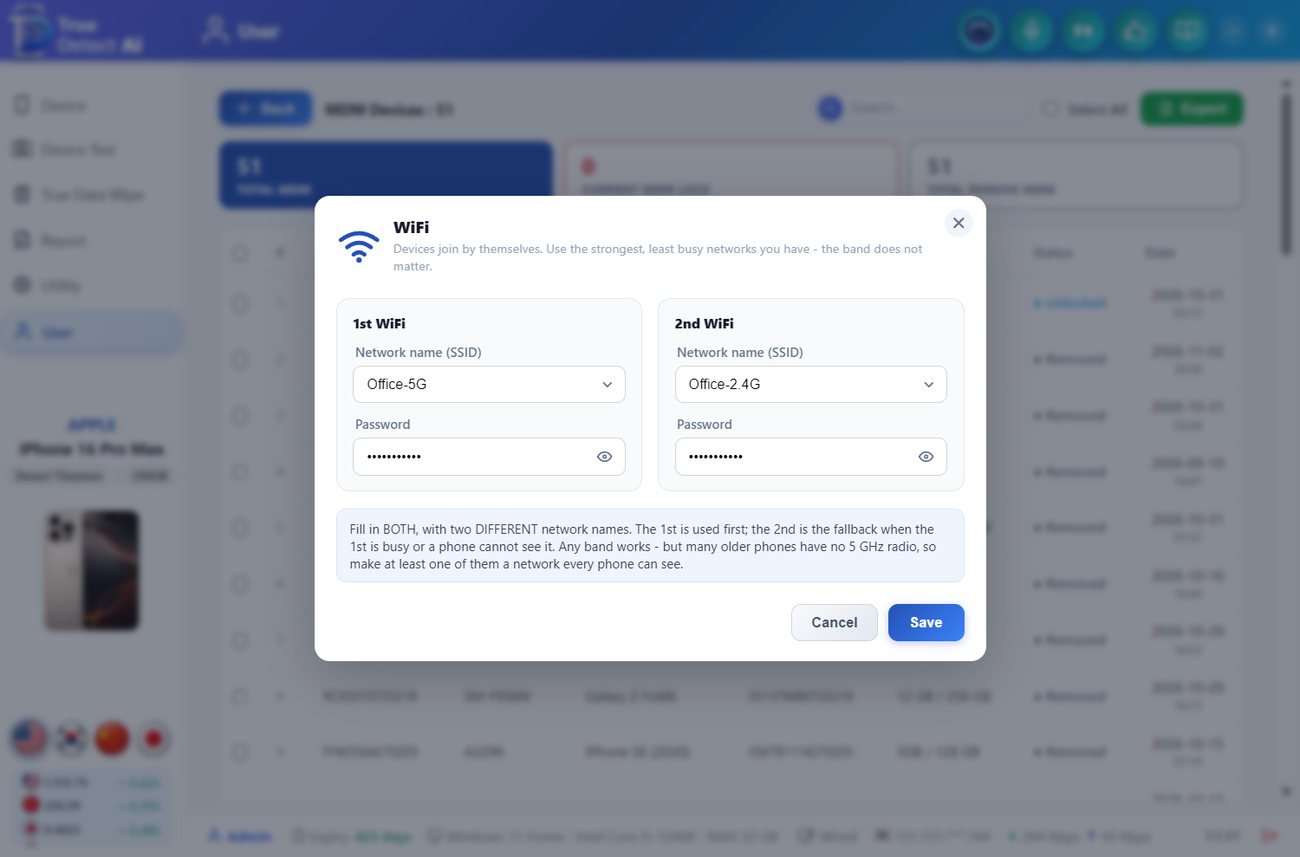
WiFi Set.

Pick or type the 1st WiFi and 2nd WiFi names and passwords, then click Save. All phones you test after that use this Wi-Fi.

← PreviousSmart Flash (firmware)Next β†’User page
πŸ‘€
CHAPTER 16

User page

Your account, your employees and your settings. Click the user name in the left menu.

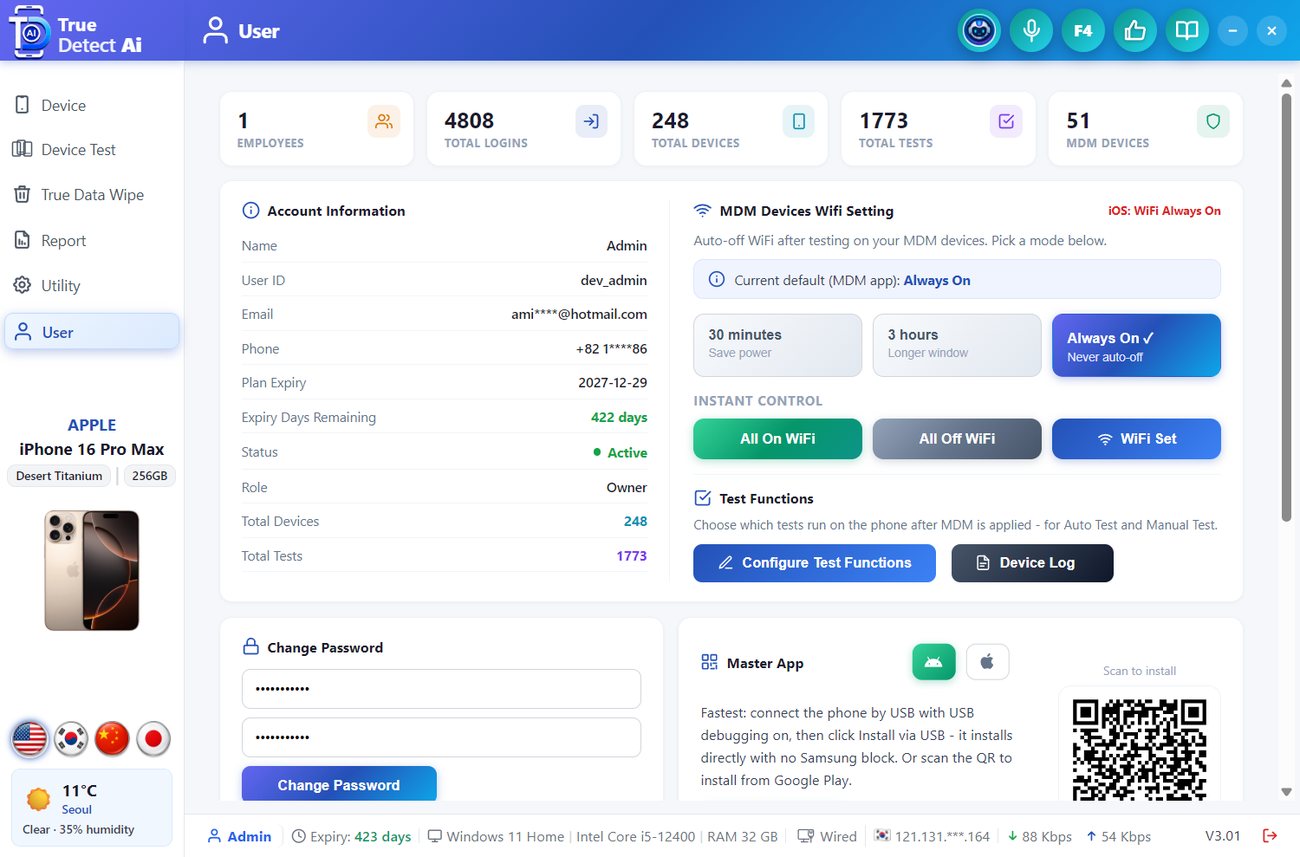
User page.

Top cards

Employees, Total Logins, Total Devices, Total Tests, MDM Devices. Click a card to open its list.

Account Information

Name, user ID, email, phone, plan expiry, days left, status, role (Owner / Administrator / Employee) and totals.

MDM Devices Wifi Setting

How long Wi-Fi stays on in your protected phones after testing: 30 minutes, 3 hours or Always On. All On WiFi / All Off WiFi send the command to all of them now. WiFi Set changes the network.

Other boxes

Lists

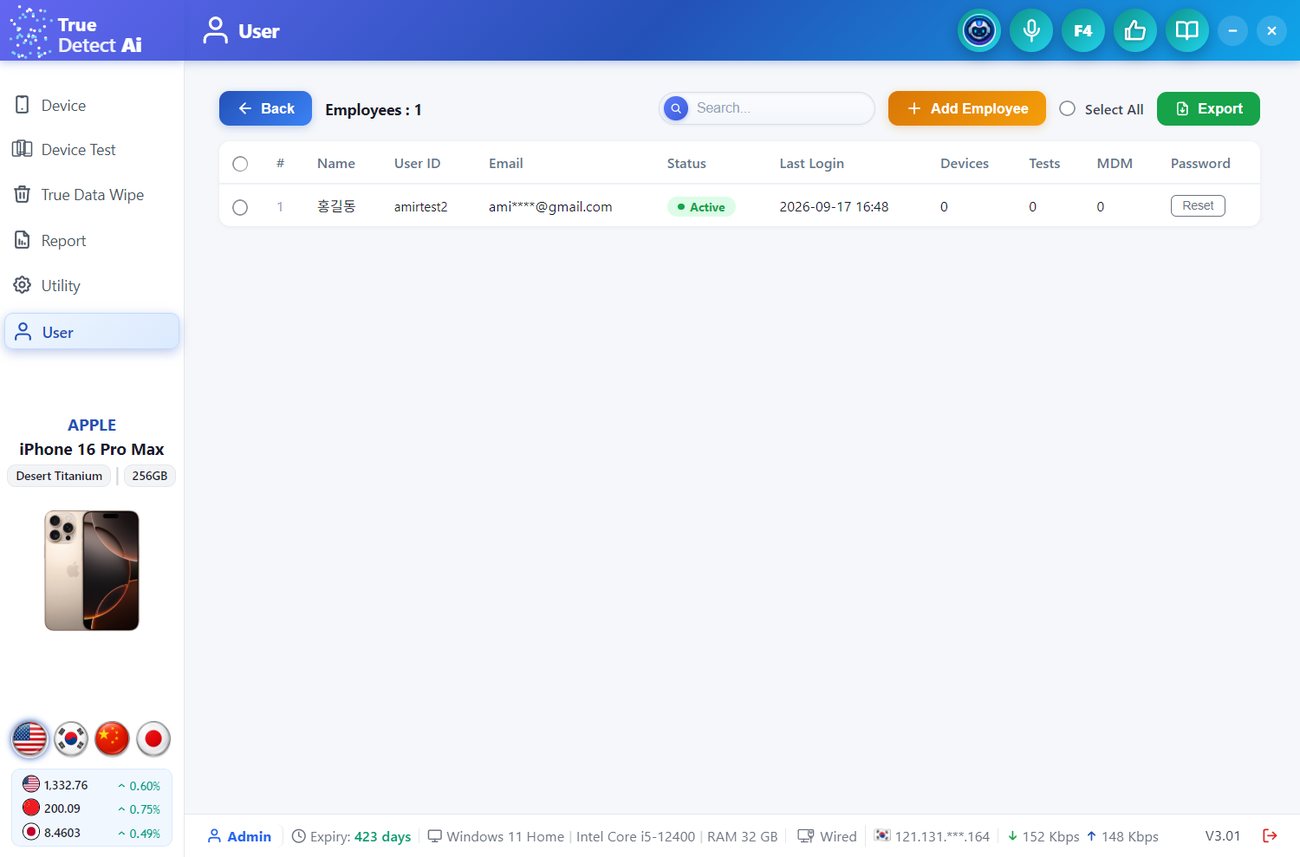
Employees.

Employees: Add Employee (name, user, email, mobile, password β–Έ Create), Reset Password, Delete Employee.

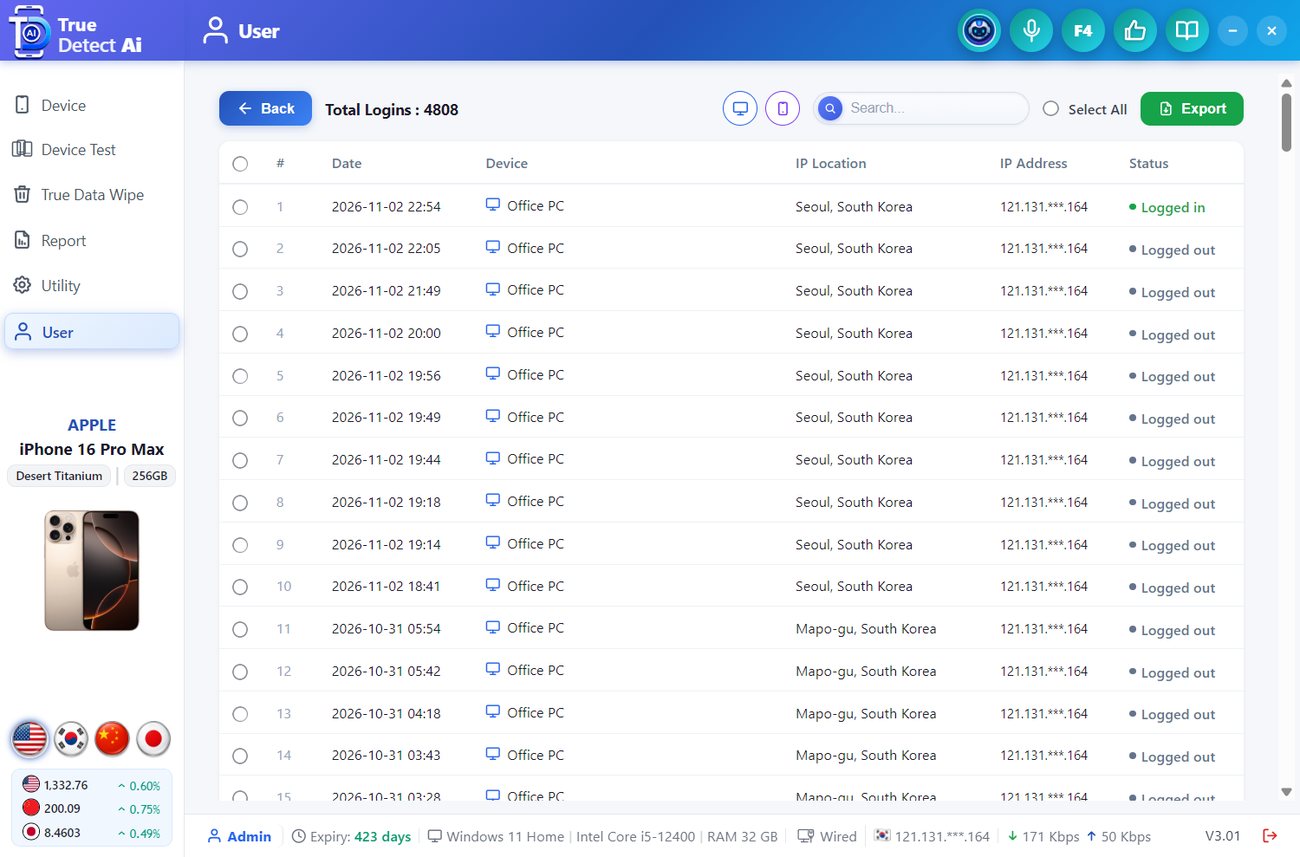
Total Logins (names and IPs hidden in this guide).

Total Logins: date, device, IP location, IP address and status of every sign-in.

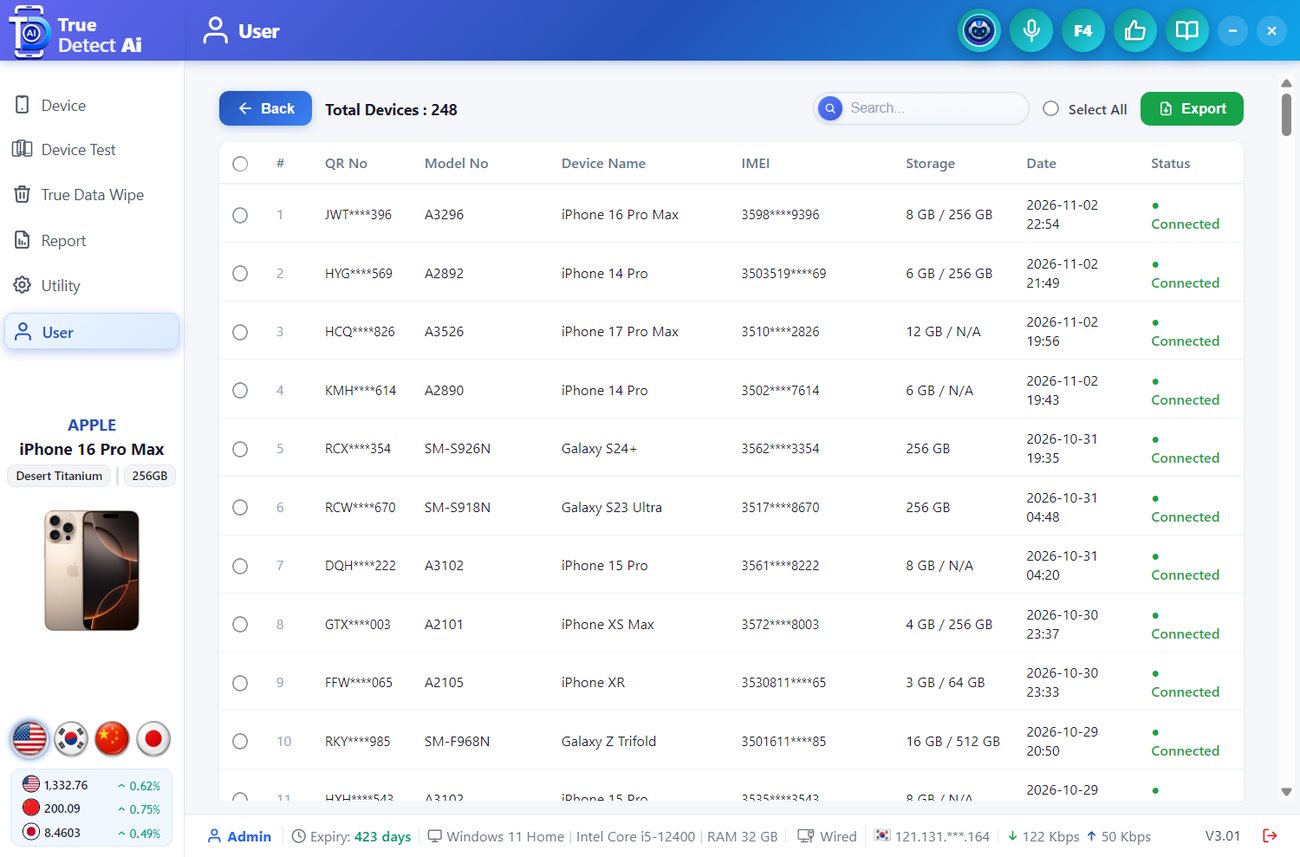
Total Devices.
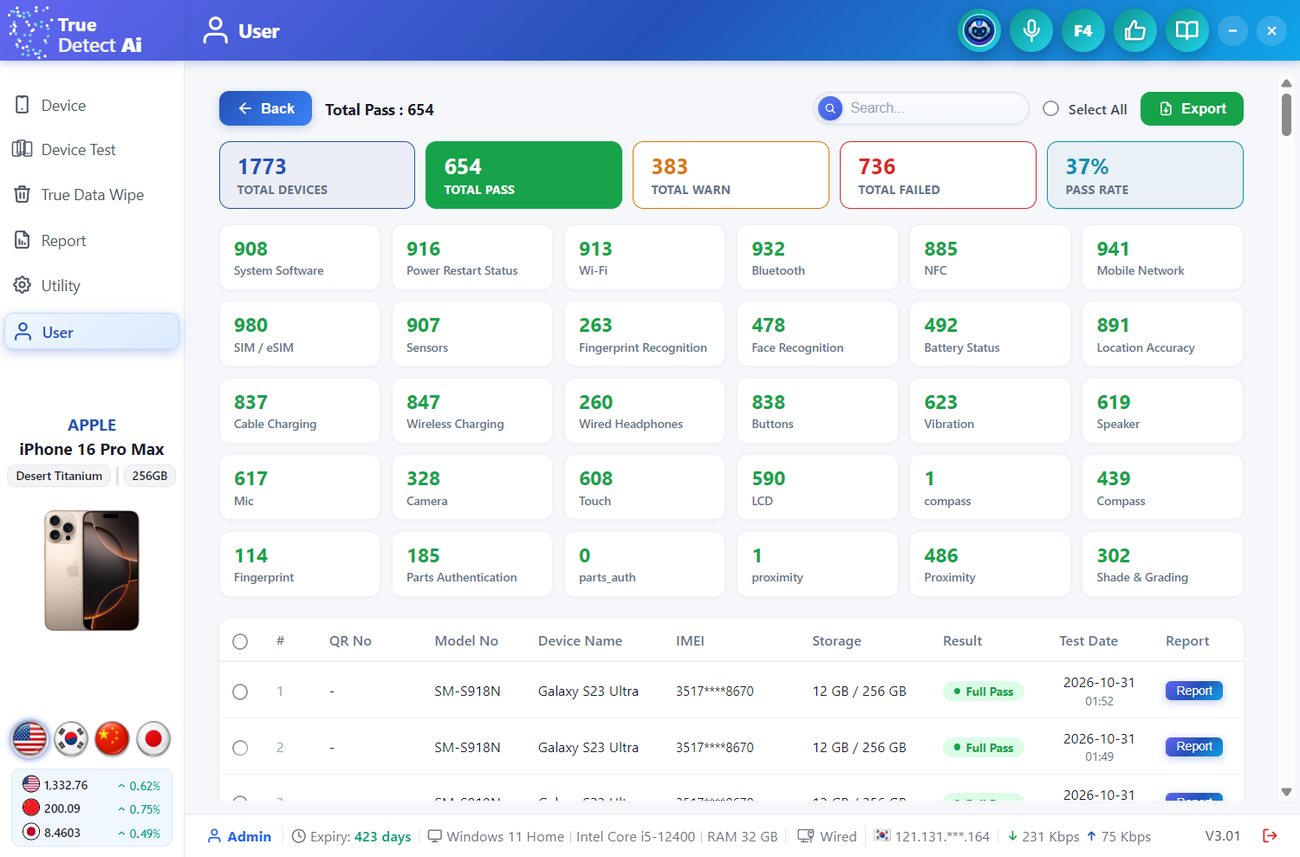
Total Tests.
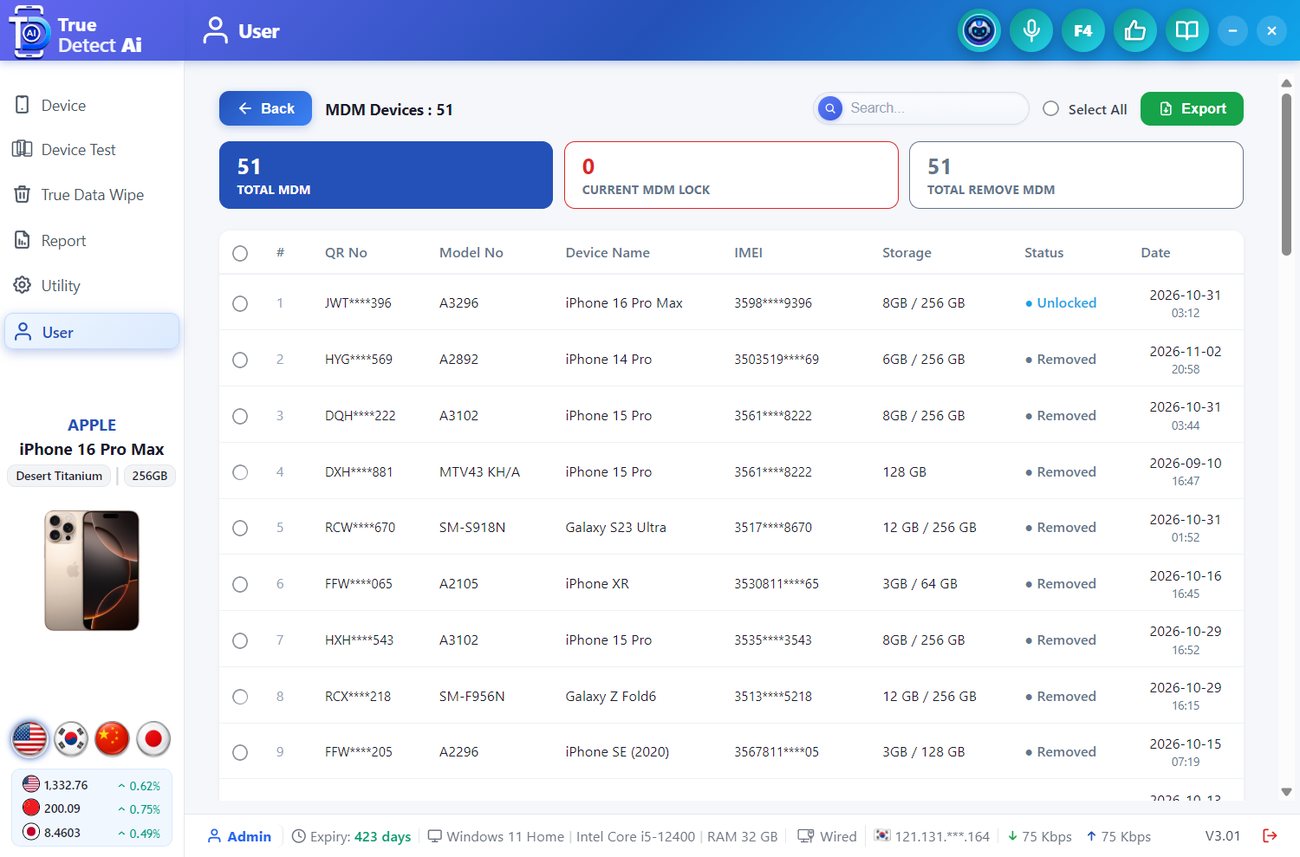
MDM Devices.

Every list has Back, a search box, Select All and Export (Excel).

Test Functions

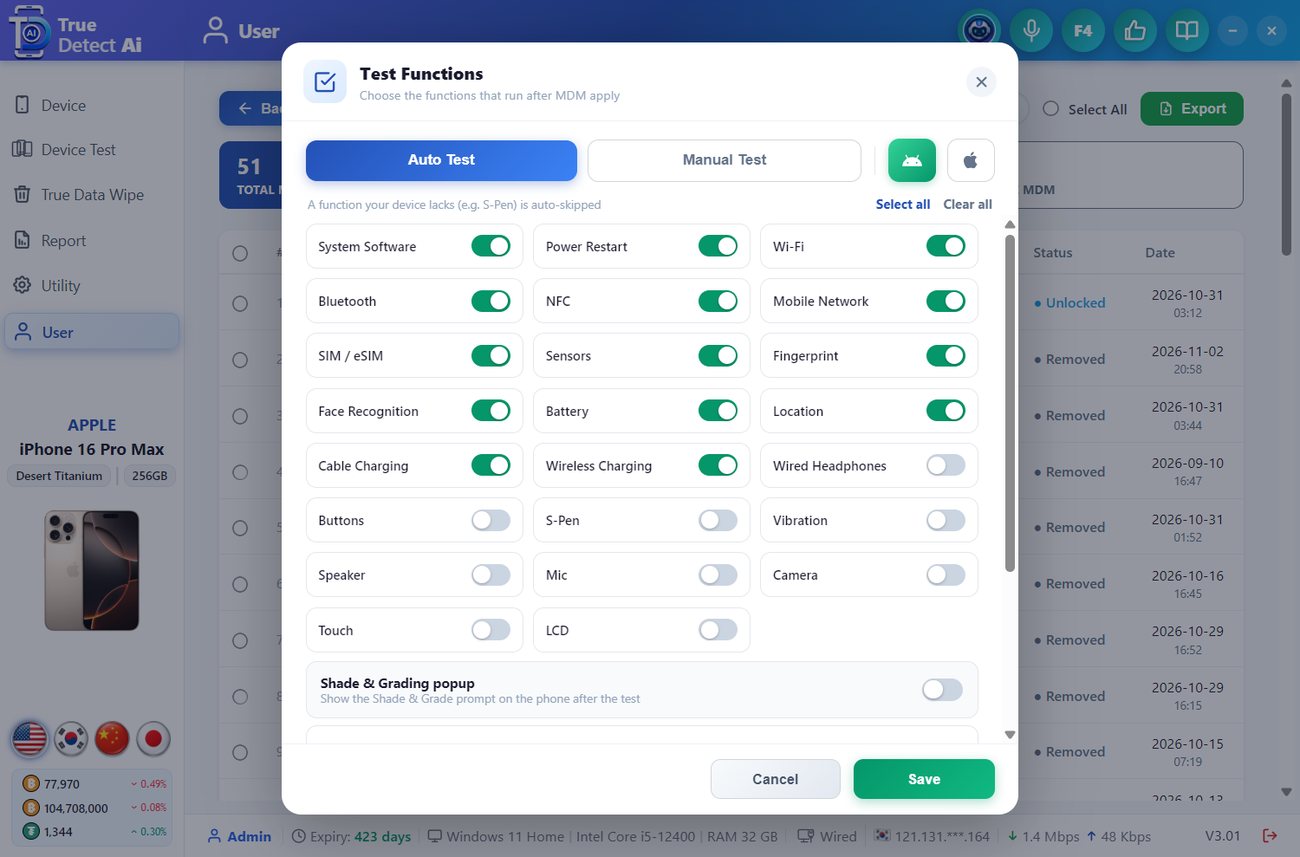
Test Functions.
  1. Click Configure Test Functions.
  2. Choose Auto Test or Manual Test, and Android or iPhone (icons on the right).
  3. Turn each test on or off. Select all / Clear all change all of them.
  4. Shade & Grading popup: ask for the LCD shade and the device grade on the phone after the test.
  5. Click Save.

A test the phone does not have (for example S-Pen) is skipped by itself.

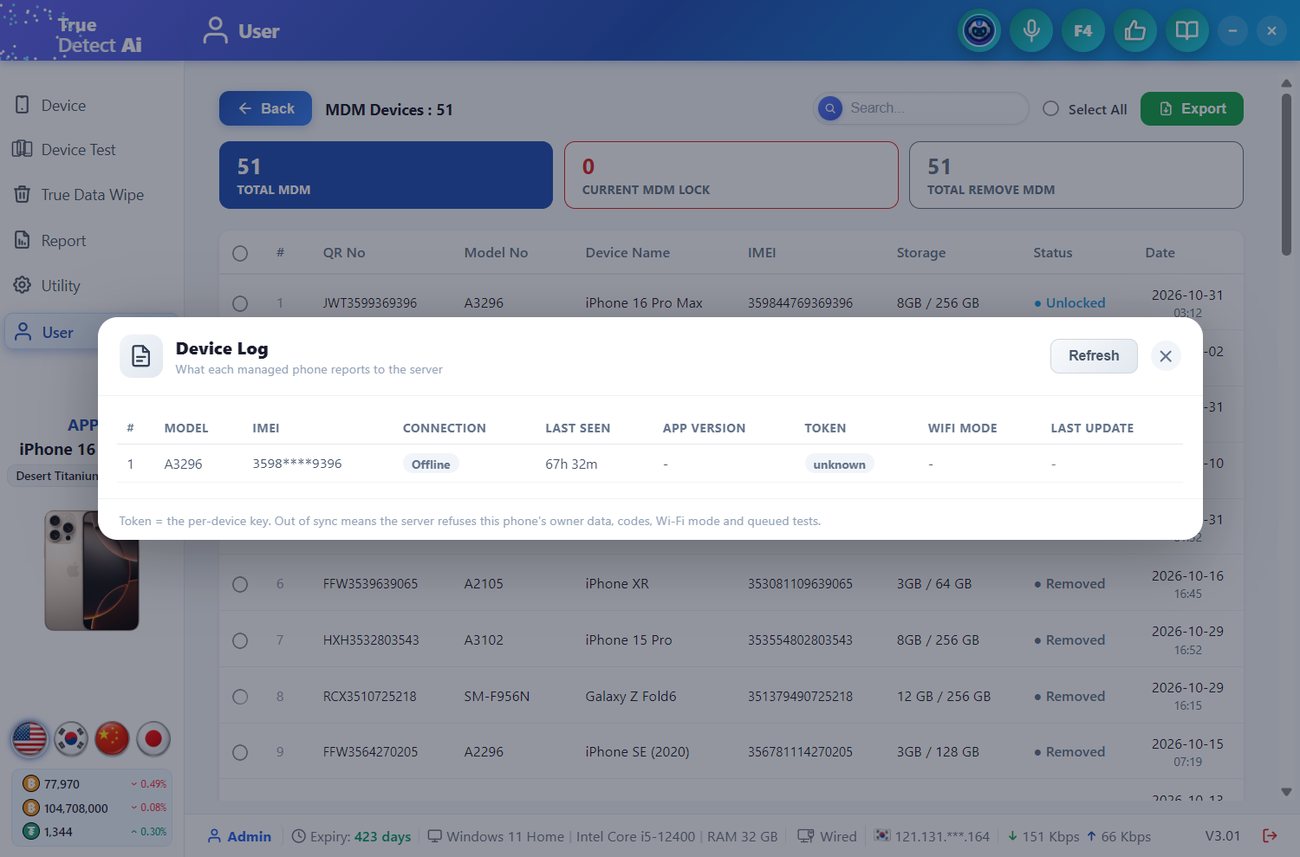
Device Log

Device Log - what each protected phone reports.

Model, IMEI, connection, last seen, app version, token state and Wi-Fi mode of every protected phone. Click Refresh to update.

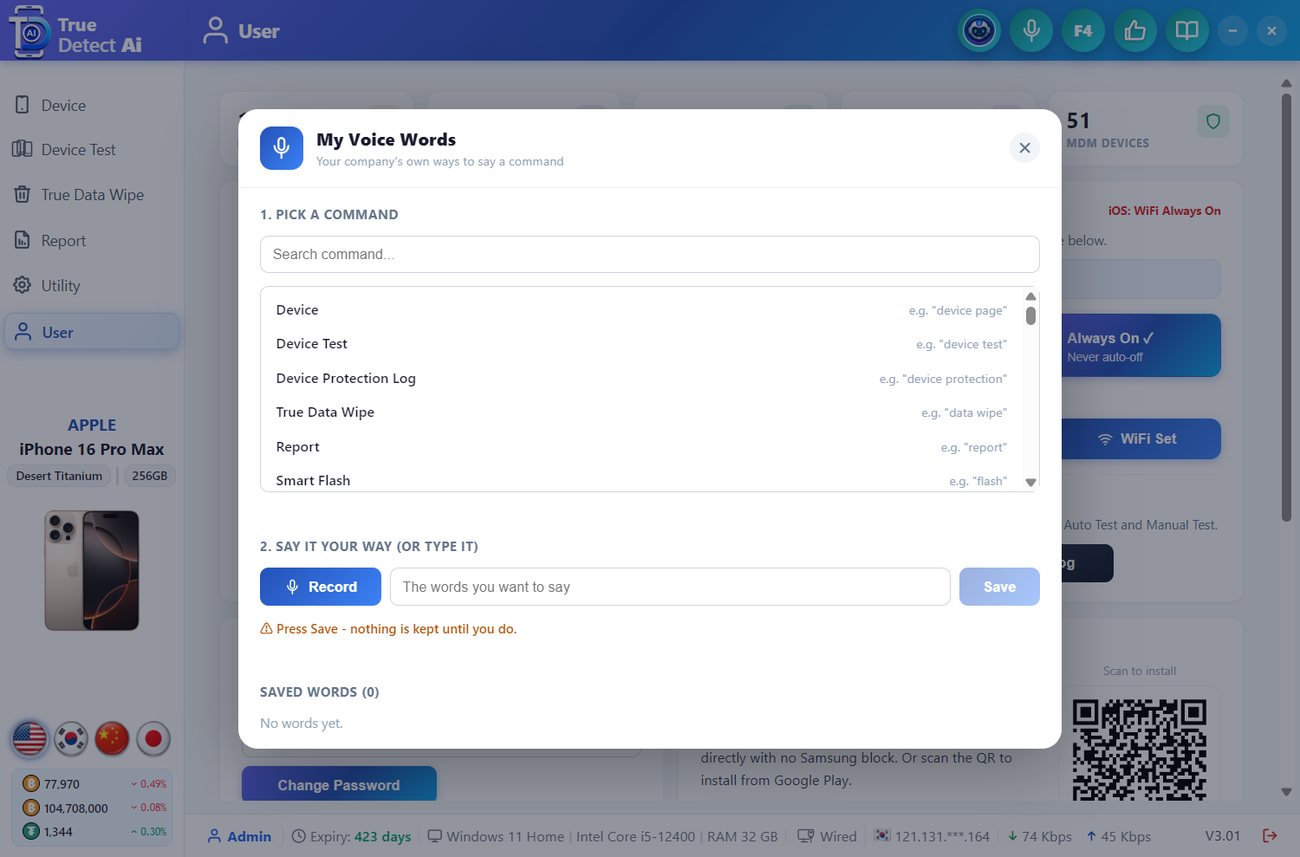
My Voice Words

My Voice Words.
  1. Pick a command from the list (search helps).
  2. Say it your way with Record, or type it (2-60 characters).
  3. Click Save. Your words appear under Saved words; Delete removes one.
← PreviousUtilityNext β†’Help, feedback & FAQ
πŸ’¬
CHAPTER 17

Help, feedback & FAQ

AI Assistant

Click the robot button in the header. Ask in English, Korean, Chinese or Japanese - for example "how do I remove MDM?".

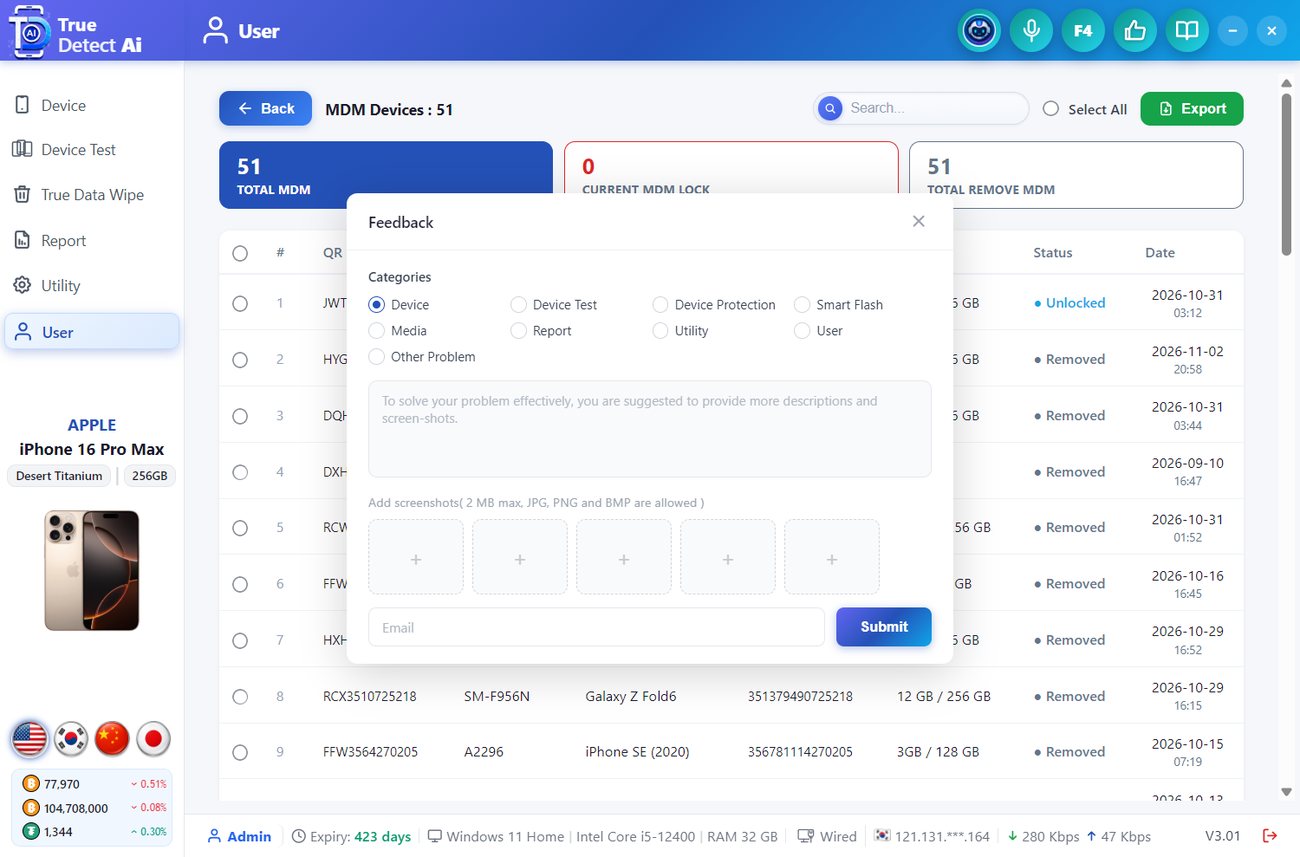
Feedback

Feedback.
  1. Click πŸ‘ in the header.
  2. Choose the page the problem is on, write what happened, and add up to 5 screenshots (JPG / PNG / BMP, 2 MB each).
  3. Click Submit. Add your email so our team can reply.

FAQ

QuestionAnswer
The phone is not found.Use the original cable, a different port and no hub. Android: USB debugging on, Auto Blocker off. iPhone: tap Trust. Then click Fix Drivers or Utility β–Έ USB Driver.
The page shows old or empty data.Press F5. The phone is read again; nothing is changed on it.
A value shows N/A.The phone does not report it. The tool never shows a guessed value.
iPhone shows "Erase needed".MDM can only be applied to an erased iPhone. Erase it, then test again.
A phone does not report back over Wi-Fi.Check the Wi-Fi name and password in WiFi Set, and that the phone is near that network.
I want to test a phone again.Tick it and click Result Remove, then Test.
Can I use the tool on two PCs?Each person signs in with their own employee account. One account is open on one PC at a time.
How do I update the tool?Updates install by themselves. Click the version in the status bar to see what changed.

Support: KakaoTalk link on the connection screen, or the Feedback button.

← PreviousUser page